This week’s sandwich, like many weeks, started when I was inspired by a concept I saw on the internet. The screenshot shared here is from a restaurant called Bill’s Sandwich Palace out of Nashville, Tennessee. I have never been to Bill’s, but I have followed them on Instagram for a few years because they share some nice-looking sandwiches. A couple of weeks ago, they shared their “El Lechón” sandwich, which appears to be a limited-time offering sandwich containing “roasted pork shoulder, unsmoked provolone, spicy pickles, mojo mayo, brown mustard, genoa salami” on rosemary focaccia.
El Lechón is a Spanish phrase that translates to The Piglet in English, typically used to mean roasted baby pig or suckling pig.
The sandwich looks beautiful, and after reading the ingredients a second time, I realized that this was a play on a Tampa-style Cuban on focaccia. And I was inspired to make something similar.

Tampa-style Cuban sandwich?
If you do not live in Florida, the Cuban sandwich you’re used to seeing on menus or the one you may have made at home is most likely what is known as a Miami-style Cuban sandwich. But there are at least two different recognized styles of Cuban sandwiches from Florida—a Miami version and a Tampa version. The Tampa variety has one extra ingredient.
Four years ago, during the first year of this sandwich blog, I wrote about and made Cuban sandwiches, but I didn’t make the Tampa variety. I made the type that’s popularized in Miami. A typical Miami-style Cuban sandwich has sliced ham, roasted pork, pickles, Swiss cheese, and yellow mustard inside of a pressed and grilled roll. But the folks in Tampa added Genoa salami to theirs.
Over the past four years, I’ve also written about the Reuben Cuban sandwich and a Cuban crunchwrap.
In 2012, there was a resolution approved by the Tampa City Council that set the “Historic Tampa Cuban Sandwich” as the city’s official sandwich, and the documentation of that resolution plainly states that the sandwich must contain salami. But why is salami in Tampa’s version and not Miami’s? The answer is likely due to the flow of immigrants into that area in the late 1800s.
Between 1880 and 1890, Tampa’s population grew from 700 to over 5,000 people. Many of these were immigrants coming to work in the cigar trade that had evolved due to the humid climate in the region. And these immigrants brought along some of the foods that they were accustomed to from their homelands. Hundreds of millions of cigars were rolled annually in the area, which has led to Tampa being given the nickname of “Cigar City.”
Cuban and Spanish workers manned the factories; German lithographers designed the cigar boxes, regarded as some of the best in the world; and Italians and Romanian Jews built groceries, restaurants, and hardware stores to serve the growing populace.
How Tampa Claimed the Cuban Sandwich – Helen Anne Travis – Serious Eats
After learning of this melting pot of foreign-born workers moving into Tampa at this time, we might better understand the reasons why Swiss cheese, sliced ham, mojo roast pork, and Genoa salami were all prevalent in the local stores and see why they all found their way into the Tampa version of a Cuban sandwich.
If you want to dig deeper into Cuban sandwich history, Serious Eats has shared some Cuban sandwich history, and NPR has a blog post titled, “Cuban Sandwich Crisis: Tampa vs Miami” that I found fun to read. Otherwise, it’s time to move on with my sandwich, which is a loose riff on Bill’s Sandwich Palace’s sandwich, which also happens to be a riff on the Tampa-style Cuban sandwich.
What is this sandwich?
I didn’t want to copy Bill’s Sandwich Palace’s sandwich entirely, and I was already making a batch of my homemade giardiniera to share with a friend, so I decided to combine the two and create a sandwich that’s similar to the build and style of Bill’s sandwich but with a couple of twists.
My version is also on homemade focaccia that I studded with roasted garlic cloves, which brings sweetness and even a bit of a nutty caramelized flavor to the soft, crispy bread. Inside the bread, I added a Dijonnaise sandwich spread, melted havarti cheese, spicy salami, garlicy mojo-roasted pork shoulder, and my homemade giardinera to bring a bit of pickly spice to the whole sandwich.
The cheese brings a nice creaminess that pairs well with the fattiness from the pork. Both are balanced by the tang of Dijon in the sandwich spread and the pickled giardiniera. Overall, this is a great sandwich that’s going to require us to make some focaccia, which in my opinion is one of the easiest and best returns on investment in bread baking. With just a tiny bit of hands-on time, we can make some great sandwich bread. Let’s do it.
First, here’s a rundown on the Tampa-style Cuban vs Bill’s Sandwich Palace’s “El Lechón” vs the sandwich I’m calling “Totally Not Bill’s Cuban Sandwich.”
| Tampa-style Cuban sandwich | Bill’s Sandwich Palace’s “El Lechón” | My “Totally Not Bill’s Cuban Sandwich” | |
|---|---|---|---|
| Mustard | Yellow mustard | Brown mustard | Dijonnaise (Dijon mustard + mayonnaise) |
| Cheese | Swiss cheese | Unsmoked provolone | Havarti |
| Meat #1 | Roast pork | Roast pork | Roast pork |
| Meat #2 | Genoa salami | Genoa salami | Hot calabrese (spicy salami) |
| Meat #3 | Sliced ham | none | none |
| Pickles | Dill pickles | Spicy pickles | Giardiniera (spicy pickled vegetables) |
| Bread | Pan Cubano (Cuban bread roll) | Rosemary focaccia | Roasted garlic focaccia |


Roasted garlic focaccia
Roasted garlic focaccia is just regular focaccia with roasted garlic cloves pressed down into the dough prior to baking. The garlic cloves are fully roasted already, so they are not bitter like raw garlic. They are sweet and nutty and bring a lot of interest to the finished bread because we also sprinkle some of the garlic oil (from the roasting process) on the top of the bread before it gets dimpled and baked.
For this bread, I made an 8 x 8-inch loaf of focaccia that I baked with my focaccia calculator that I released in 2024. It’s a tool that will allow you to set the size of the pan you wish to bake in—circular or rectangular/square—and then the recipe will be created using some math to give you the proper amount of ingredients for that pan. I’ve tested it a bunch, but last week someone on Bluesky asked if I had tried the recipe with an overnight refrigerator proof. I had not, but there’s no reason why it wouldn’t work, so I tried it.
At least one sandwich down below (and the one loaf you’re about to see in photos) does not have the roasted garlic focaccia in the top because I made two test batches that I allowed to proof in the fridge for about 18 to 20 hours to get a bit more testing, so I could add that to my focaccia calculator notes.


As you can see, that works just fine, and it does give the focaccia a subtle amount of yeastiness that’s not present if you bake the focaccia immediately. Is it something I will do often when making focaccia? Not always because I don’t always have the time to wait a whole day, but if I am feeling extra prepared, I know that I can throw it in the fridge for 1 to 2 days until I’m ready to bake.

Roasted garlic
Roasting garlic is super simple to make. The process is especially easy if you buy pre-peeled garlic cloves from your grocery store. It is more expensive to buy garlic this way, and you will probably have some food waste, but for my household, it makes sense because we cook so much.
You can roast peeled and unpeeled garlic cloves in pretty much the same way. If you have a whole head of garlic, you can trim off the top of the head and place it in a piece of aluminium foil with a touch of olive oil and salt, and then wrap it up. You can roast it around 350 to 400°F for anywhere from 40 to 60 minutes. You can do the same thing with peeled cloves.


Once you have roasted garlic and once the focaccia dough has risen once and it has been folded into position in your well-oiled pan, you can poke all the soft garlic cloves into the top and allow the dough to rise once again for at least an hour or until it’s very puffy and bubbly.
After that, it’s time to add more oil and dimple the top. The dimpling process seems like it might be counterproductive because you’re releasing the gases that you want to be in the finished bread, but it serves the purpose of making sure that the whole loaf of focaccia rises evenly across the top.


Focaccia calculator
In late 2024, I introduced my focaccia calculator. What’s a focaccia calculator, you might be asking? It’s an online tool that you can use to create a focaccia recipe that fits the pan you want to use. You first measure your pan, plug in the shape of the pan (circle, square, rectangle) and the dimensions of that pan, and the focacia calculator will use math to figure out the rest.
This focaccia calculator doesn’t require a kitchen scale, but it will help. Otherwise, I typically make this recipe without a stand mixer or any other special tools. I just use a bowl, a spoon, and the pan of my choice. Give my focaccia calculator a shot and thank me later when you’re enjoying some crispy focaccia, fresh out of the oven.
Focaccia pan calculator
This tool will build an ingredient list to help you create a focaccia to fit the size of the pan that you want to use. Enter the shape and size of your pan and the Focaccia Calculator will do the rest.
Garlicky mojo-roasted pork shoulder
I have shared a few sandwiches where the main protein is slow-roasted pork shoulder, and this one fits right in that category. When I wrote in the past about the Cuban sandwich, I shared my mojo roast pork recipe, which is different than this recipe, but some of the flavors are very similar. That recipe would work perfectly in this sandwich, though, if you wanted to try it instead.
Mojo marinated roast pork
5 hours and 15 minutesThat recipe uses an overnight marinade, and the recipe I’m sharing today swaps that for building and adding flavors during the oven roasting process with salt, black pepper, garlic, cumin, orange juice, lime juice, and orange zest. The garlic roasts in the meat and gets mixed into the pork when it’s fully cooked.


Once the meat has cooked in a roasting pan with the lid on for 3 hours, I remove the pan, pull off all of the visibly dark garlic cloves and place them in a bowl and then add the pan with the pork back into the oven (without the lid) for a final 30 minutes to darken some of the meat. You can probably leave the garlic cloves in, but I just didn’t want them to get too dark.
Once the meat is fully cooked, I let the meat cool off, add the extra roasted garlic cloves back onto the pile, and pull the pork into bite-sized or sandwich-sized pieces.


You can cook this pork in advance and then make the sandwich by heating up a sandwich amount of pork in a skillet so that your sandwich will be hot. This not only warms up the meat, but it also helps to render any extra fat left in the pork to make things crispy, which adds texture to the final sandwich. You can also heat up the meat in the microwave, but heating on the stove really brings a fun texture that you simply can’t get with the microwave.
Spicy salami
Bill’s version of the sandwich used salami, which is just like the Tampa version of the Cuban sandwich, so I also reached for a little salami. I found this trio of Italian meats that contained pepper salami and hot calabrese, which is a version of salami from the Calabria region of Italy.
My hope was that the salami would add some spice to the sandwich, but so did the giardiniera, so you could probably just opt to buy regular Genoa salami instead. The texture of the salami is nice in this sandwich, though, and it builds a nice base for the roast pork to sit on.

Homemade giardiniera
Giardiniera is awesome, and it’s a great addition to a sandwich. If you’ve never had it, it’s basically an assortment of slightly softened pickled vegetables that are marinated in spicy oil. Giardiniera can be purchased in mild, medium, and hot or spicy versions, so it doesn’t have to be a super spicy sandwich component. My recipe is probably a little on the spicy side of mild, so it’s very tolerable for anyone but the most spice-averse palates.
But since you’re making the recipe yourself, you can leave out some of the spicy stuff or add more to adjust to your own tastes.


If you’ve never had giardiniera, you might have noticed from the photos above that it’s pretty colorful. That’s because there’s quite an assortment of vegetables in giardiniera, and they all have different levels of toughness or chewiness. This means that to make a good giardiniera, some of the vegetables need to be cooked slightly so that they don’t stand out as too crunchy or chewy in the finished mix. In my recipe, I have a two-stage vegetable addition to the simmering brine to ensure that the carrots and cauliflower get cooked a bit more than the red bell pepper and celery. There are also pre-pickled veggies like olives and pickled jalapenos, and pepperoncinis that should already be softened a bit, and they are added to the marinade after the brine is removed from the heat.
Congealing oil?
There are some issues you might face when making your own giardiniera using olive oil. I have started adding some notes from my experiences below my giard recipe, but basically, if you make your giardinera with olive oil, you’ll find that it thickens and almost congeals in the refrigerator. You can pull it out 20 minutes before you use it, and the consistency will go back to normal, but if you want to quickly grab some from the fridge and use it, the oils will have thickened as they cool.
You can solve this issue by opting for a different type of oil. Yes, olive oil tastes good, and if that’s what you’re concerned with, you’ll just have to deal with the minor issue of it congealing in your fridge. If you look at the labels of store-bought giardiniera, you’ll see mentions of “vegetable oil” or “soy oil” on the ingredient list because they are aware of this issue with olive oil, and they’re using oil types that will not congeal at colder temperatures.
Here’s my giardiniera recipe. Stay tuned, there might be more giard content coming soon.

Giardiniera
This giardiniera recipe is spicy but not super-hot. I'd list it as between mild and medium heat. Add more pickled jalapenos (and the pickling liquid) or leave them out entirely to adjust the heat level for your sandwiching experiences.
Get RecipeDijonnaise (the quick way)
Dijonnaise is simply the combination of Dijon mustard and mayonnaise, and it brings a nice bit of tangy mustardy flavor to the sandwich, while still spreading on the savory mayonnaise. You could just apply them both to the focaccia, but I combine them in a small bowl so that it’s easy to manage the amounts.
I have two recipes for Dijonnaise on this website, and the first one here is the most complicated because it makes the mayonnaise from scratch. The second one is what I used for this particular sandwich, and it takes like 45 seconds to create because, as I said, it’s literally just combining mayonnaise and Dijon mustard in a 2:1 ratio. Stir it up and you’re done.

Homemade dijonnaise
A lot bit creamy and a little bit mustardy. This combination is almost perfect for your next cold-cut sandwich or jam-packed, meat-filled sub.
Get Recipe
Quick dijonnaise
2 minutesHavarti cheese slices
I used Havarti cheese slices for my sandwich. A true Cuban would be using Swiss, but I wrote about Swiss cheese in last week’s sandwich and used it all up, so instead I went with Havarti because I knew it would be creamy and it would melt really well.
You could use provolone (like Bill’s Sandwich Palace used in their sandwich), or you could even use something like mozzarella or even cheddar if that’s what you had on hand. The way I suggest adding the cheese and running it through the broiler, pretty much any cheese will work and melt. So, use the cheese you like.

Sandwich build process
Once you have all the ingredients ready to go, the build process is easy. First, you need to spread some Dijonaise on the bottom slice of focaccia and top that with a slice or two of Havarti cheese. Broil the top and the bottom piece to melt the cheese and toast up the bread, and then layer the salami on top of the Havarti to create a great layer for a pile of the crisped-up mojo pork.
Top the pork with a couple of scoops of giardiniera and then add more Dijonnaise to the top of the focaccia and close it all up to finish the sandwich.

Spread a nice layer of Dijonnaise on the bottom slice of focaccia. 
Add slices of Havarti. 
Broil the top and bottom to melt the cheese and crisp up the bread. 
Layer on some salami to build a base. 
Add pulled pork that has been crisped up in a skillet. 
Top everything with giardiniera. 
And complete the sandwich with the focaccia hat.
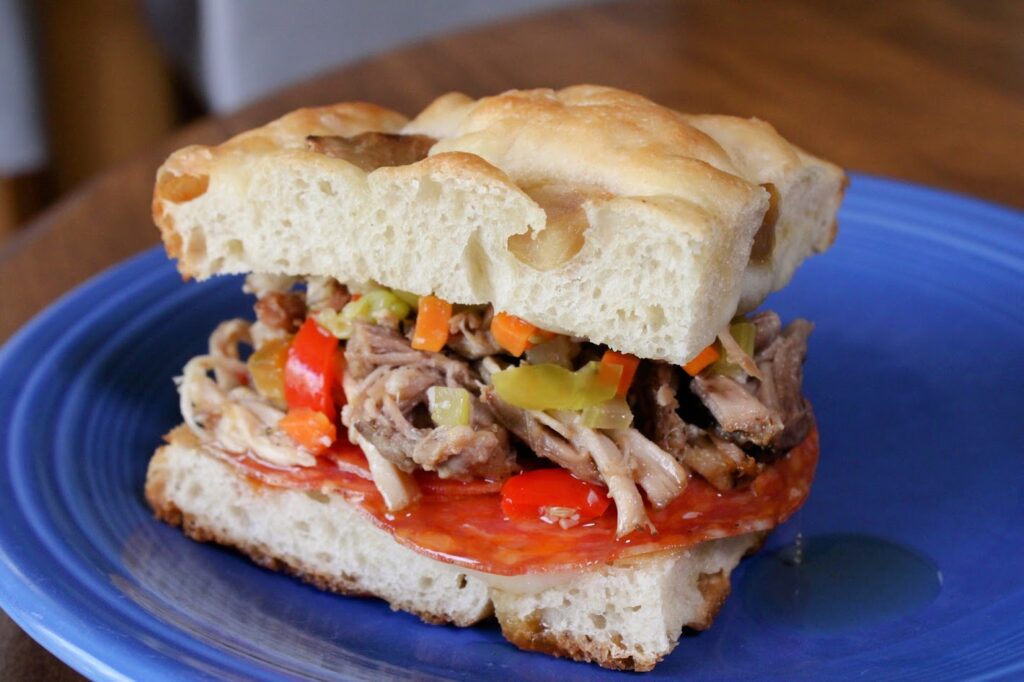
Totally not Bill’s Cuban sandwich photos and recipe
This sandwich, while not at all a Cuban sandwich, has some similar components that remind me of a Cuban sandwich. The Dijon mustard brings the concept of yellow mustard. The giardiniera is pickled just like pickles are, and while Havarti isn’t Swiss, it sure does melt well, and everything works well together, along with the salami and roast pork.
This is a fun sandwich to make, and you can make your own using the recipe just below. Check out a few photos before you get to the recipe, and let me know on social media if you give it a shot!


Totally not Bill's Cuban sandwich

This pork-focused delight of a sandwich on sliced focaccia brings big flavor that's balanced by melty Fontina and a slightly spicy zip from giardiniera. This sandwich is loosely based on the El Lechón sandwich from Bill's Sandwich Palace in Nashville, Tennessee.
Ingredients:
Garlicky-mojo slow roast pork- 1 tablespoon salt
- 2 teaspoons black pepper
- 1 teaspoon cumin
- 1 tablespoon fresh parsley, finely chopped
- 2 to 4 tablespoons olive oil
- 3 to 4 pound bone-in pork shoulder or pork butt
- 20 cloves of garlic, peeled
- zest from one orange
- juice from 2 oranges
- juice from 2 limes
- 2 tablespoons mayonnaise
- 1 tablespoon Dijon mustard
- 1 four inch square piece of focaccia (recipe link)
- 1 to 2 tablespoons Dijonnaise (from above)
- 1 to 2 slices Fontina cheese (can use Swiss or provolone)
- 2 to 3 slices of salami
- garlicky-mojo pork (from above)
- giardiniera (can use pickles, pickled banana peppers or pickled jalapenos)
Directions:
Preheat your oven to 350 degrees F (175 C).
Spice blend: add salt, black pepper, cumin, and finely chopped parsley to a small bowl and stir to combine. This is the spice blend for the pork.
Garlicky-mojo pork: rub a bit of olive oil all over the pork shoulder and then sprinkle the spice blend on top, making sure to rub it into all the crevices. Make sure no parts of the pork are unseasoned.
In a Dutch oven or large oven-safe pot, add your fully seasoned pork and place it in the middle. Cut about 20 1-inch-long slits into the top of the pork about 1 inch deep. Poke 1 clove of garlic into each slit and push it down so that the garlic is mostly tucked inside of the meat.
Pour the juice of 2 oranges and 2 limes into the Dutch oven or pot, around the pork. Sprinkle the zest of one orange on top of the pork and into the liquid.
Add a lid or cover to your oven-safe pot and place it in the preheated oven.
Cook for 3 hours with the cover on the pot. If you don't have a cover, you can cover the pot with aluminum foil.
Once 3 hours are over, remove the cover/lid from the pot and cook for an additional 30 minutes. If the garlic cloves are extra dark (almost black) you can remove some of them with a fork or tongs to a bowl so that they don't darken too much. You will add them back when the meat is fully cooked.
Remove pork from the pot (don't discard any liquid left in the pot just yet), place it on a cutting board, and allow the meat to rest for 45 minutes to 1 hour. Add the roasted garlic cloves back on top of the pork, and then pull the meat from the bone and use two forks or your fingers to separate it.
After you pull the pork, add all of the meat to a container that you can store in your refrigerator (unless you plan to eat it all in one sitting). If there was any liquid left in the pot you cooked the pork in, you can pour that into the container with all of the meat.
Dijonnaise: mix mayonnaise and Dijon mustard very well to combine. Store in the fridge for up to a month.
Sandwich assembly: warm up a sandwich-sized amount of pork in the microwave or, preferably, in a skillet over medium heat for 5 to 7 minutes. The meat should crisp up a little bit, which will give the sandwich some texture.
While the meat is warming, spread some Dijonnaise on the bottom slice of the focaccia. Top that with slices of Fontina cheese. Add both the top and bottom pieces of focaccia to a broiler and broil to melt the cheese and toast the bread. If you don't have a broiler, you can melt the cheese in a 350°F oven for about 5 to 7 minutes.
Once the cheese is melted, layer on some slices of salami. Top the salami with some warmed-up crispy pork and a couple of spoonfuls of giardiniera. Close the sandwich with the toasted top piece of focaccia and serve.
Notes:
Check the blog post about this sandwich if you want to learn more or read any tips and tricks for the recipe.
Check back next week
Next week, we might be getting fancy with some cheap cuts of steak. We also might be investigating a way of making bread without baking because it’s hot out there!

