
At some point in the recent past, I saw an Instagram reel where a sandwich was created that started with a base of French onion dip. Sounds delicious already. I may potentially make something inspired by that concept at some point, but it made me think of which other dips might make for good sandwich ingredients, and that led my thoughts to the all-time classic, spinach and artichoke dip.
While we’re on this topic, I think another well-known dip that would make a great base for a sandwich is the buffalo chicken dip which became popular ten or fifteen years ago. Maybe I’ll make another dip-focused sandwich in the future. But for now, we’re in spinach and artichoke dip mode, and for a spoiler alert, it works well in a sandwich.
Spinach and artichoke dip is one of those things like sun-dried tomatoes that you likely saw on every menu in the 1990s. But this dip is such a classic that I think it’s creeping back in.
FYI: this is not a super creative idea where I might be the only person to have thought of it already. I did a little research prior to pressing submit on this blog post. There are a ton of spinach and artichoke dip sandwich recipes out there. Most of them that I saw are focused on being a spinach-and-artichoke-focused grilled cheese so I tried to make mine unique with additions that seemed to make sense together. Keep reading to see where I end up.
First, I need to make some bread.
Multi-seeded sandwich rolls
If you’ve been reading along for the past few weeks, you might remember that I made buns that I packed full of rolled oats and various seeds. I enjoyed that recipe so much that I thought I would try the seeds in other buns or rolls. It worked just as well as I expected based on the last recipe.
The seeds in this recipe should be fairly available in the bulk section of most grocery stores. If you can’t find some of them, you can just leave them out, no big deal. The three most important seeds and oats that make everything work well in my opinion are the rolled oats, the sunflower seeds, and the poppy seeds. Those should all be easy to find at most stores. But again, if you can’t find one or another, just leave it out. These seeds are mostly just adding texture and maybe a tiny bit of flavor.

I’ve said this before, but the base recipe for this roll is my most simple bread roll recipe on the site. If you have a little patience and the ability to see a project to fruition, the recipe is almost foolproof. I have baked it many times and it’s also one of the bread recipes that I have shared that folks love to send me photos of their attempts. The addition of seeds just gives these rolls a bit more excitement in each bite.


Here’s my multi-seeded sub roll recipe. As I wrote when I was testing the original seeded bun recipe, you’re going to have to buy these seeds in bulk and you can use any leftovers in a simple granola if you want. Also: seeds last a long time if stored properly so you can keep this mix around for your next batch of bread.

Multi-seeded sub rolls
Want to add a bit of additional texture, flavor, and excitement to your typical sub rolls? This multi-seeded roll recipe will do just that and leave you with a soft roll that's perfect for your next sub sandwich.
Get RecipeSpinach and artichoke dip
I’m guessing that if you’re reading along, you’ve had spinach and artichoke dip before. If you have not, it’s a creamy dip that is loaded with cheese, spinach, and chopped-up pieces of tender artichoke hearts.
If you’re reading this and you’ve never had spinach and artichoke dip before, you should find a Chili’s, Applebee’s, or the Cheesecake Factory and give it a shot. You can come back and read the rest later tonight when you’re back home. Or you can just make your own. You choose.

My recipe, like most spinach and artichoke dip recipes on the internet, starts with frozen spinach and canned artichokes. These two ingredients plus cream cheese, sour cream, mayonnaise, parmesan cheese, and mozzarella cheese make up the bulk of the things you will need to get this dip ready for baking.
This dip is heavy on cream cheese, and I don’t know if I’ve said this in this blog before, but I do know that cream cheese is a top-tier sandwich ingredient. I learned this while attempting to make Seattle-style hot dogs, but just trust me, it’s a true statement. If you’ve loved bagel sandwiches in the past, spread that cream cheese onto your next sandwich and you’ll see what I mean. Note: cream cheese works best in a sandwich when the bread has been toasted.
You can make the base of spinach and artichoke dip a couple of days in advance. You simply prepare everything right up to the act of baking. Then you can store it in a sealed container in the fridge for a few days or up to a week or so before baking. This means you could (and I have) bake small portions at a time if you only want a little dip instead of a large baking dish full if you only need a little dip for your party or solo snacking adventure.

Here’s my spinach and artichoke dip recipe. Use this one if you want to make the dip to eat as it was originally intended to be prepared and eaten with chips or crackers. The ingredients and instructions for the base of the dip are also in the main sandwich recipe further down this page.

Spinach and artichoke dip
This creamy and cheesy dip is perfect for your next tortilla or pita chip experience. I also love spreading this on a cracker with a knife.
Get RecipeGrilled chicken
The chicken is the easiest part of this recipe. It is also the part that I bet a lot of people mess up. Cooking chicken is easy if you cook it to a certain temperature instead of cooking it for an exact period of time. I cook a lot and I am still not too proud to pull out an instant thermometer when I grill or cook. I typically will start out by following instructions to cook the chicken for X number of minutes but a little before the time is up I will start taking temperature checks with the goal to remove the meat from the heat slightly before it hits the proper temperature.
If you get chicken grilled to the proper temperature it will end up being fully cooked yet still nice and juicy. This means that your sandwich will not be full of dry meat stacked on top of a creamy dip. In my experience, perfectly grilled chicken doesn’t take a lot of practice, it just takes the proper tools and effort to achieve.
I use a ThermoWorks ThermoPop to quickly check meat temperatures. I have the old ThermoPop which works like a charm for me, but here’s their ThermoPop 2 which I would assume is just as good if not better (the old version like the one I have is sold out in their store).


You could easily turn this into a vegetarian sandwich if you wanted. Just hold the chicken back and it would still be a fantastic sandwich, it would just be more like a grilled cheese in the creaminess since there’s tons of cheese in the dip.
Sweet and slightly spicy pickled peppers
This is similar to the MSG dill pickle recipe that I shared years ago, except these use bell peppers and some banana peppers instead of cucumbers. But these peppers have a whole different texture and their own sweetness that they contribute to the sandwich or simply to your next charcuterie board.
The spicy part of this recipe comes from the banana peppers, which really aren’t very hot in spice, but if you have problems with heat, you can simply just leave them out of the recipe.


This recipe takes about 10 minutes if you’re handy with a knife. Maybe 15 if you need to take a few extra minutes to ensure that you’re not cutting parts of your fingers off. The peppers need to sit in the vinegary brine for a day or so and then they’re ready to eat.
You could use any sort of pickles in this sandwich if you aren’t a fan of bell peppers. I personally love the sweet flavors of orange, red, and yellow bell peppers but hate the taste of green ones so this is a great combination of pickled pepper flavor for me.


Sweet and tangy pickled peppers
These slightly spicy pickled peppers will add great texture and a tangy zing to your next sandwich.
Get RecipeThe spinach artichoke and chicken sandwich
Below is my full recipe for this sandwich (minus the pickled peppers—that recipe is above). The creamy cheesy spinach and artichoke layer on the bottom of the sandwich contributes a whole lot of excitement to what would normally be just a plain, grilled chicken sandwich. Give it a shot if you’re looking for something new to spice up your sandwich game.


Wrap this sandwich
You might have heard me talk about wrapping sandwiches before, but this is one sandwich that really benefits from wrapping in butcher paper or even aluminum foil after you assemble it. The hot and creamy dip will help to warm all the other sandwich ingredients, and everything just starts to meld together a bit better. The sandwich is great without wrapping, but it rises a notch or two after being wrapped in paper and allowed to rest and warm through for 3 or 4 minutes before consuming. Go make a drink or get some chips ready while your sandwich takes a break.


Spinach and artichoke dip chicken sandwich

This sandwich is based on a creamy layer of spinach and artichoke dip with juicy chicken and tangy pickled peppers.
Ingredients:
Spinach and artichoke dip- 8 ounces frozen spinach, thawed, squeezed
- 14 ounce can baby artichokes, drained, squeezed and chopped
- 8 ounces cream cheese, softened and room temperature
- 1⁄4 cup sour cream
- 1⁄4 cup mayonnaise
- 2 garlic cloves, minced or pressed
- 1⁄2 cup parmesan cheese, shredded
- 1 cup mozzarella cheese, shredded
- 1 tablespoon vegetable or neutral oil
- 1 chicken breast
- salt and pepper to season
- 1 six-to-eight-inch bread roll
- spinach and artichoke dip (from above)
- grilled chicken (from above)
- pickled peppers (link to recipe)
Directions:
Spinach and artichoke dip: drain the spinach and artichokes.
Place the spinach in the middle of a paper towel or clean kitchen towel and squeeze out as much liquid as possible. Place the spinach in a bowl while you prepare the rest of the ingredients.
After the artichokes have drained, pat them as dry as possible with paper towels. Remove as much moisture as you can. Once they are fairly dry, chop them roughly and place them in the bowl with the spinach.
In a large bowl combine the rest of the ingredients from the dip section and mix well. Add the spinach and artichokes and using a sturdy spoon, stir to combine everything. This is the base for spinach and artichoke dip. You can store this in a sealed container in the refrigerator and bake it in a casserole dish at 350 F (175 C) for 20 minutes and you'll have a great dip. But we're using it in a slightly different way, for sandwiches.
Grilled chicken: preheat the grill or a grill pan for 10 minutes.
Add 1 tablespoon of oil to the chicken and then coat both sides with salt and ground black pepper.
Place the chicken on the grill or grill pan and cook for around 5 to 6 minutes per side. If you have a very large chicken breast you might want to grill for 7 minutes per side. If you have a probe thermometer you should be looking for 165 degrees F (73 C). You should be able to pull the chicken off the grill 5 degrees less than your target temperature and it will carry over to cook those extra degrees while it is resting.
Once the chicken is fully cooked allow it to rest for 5 minutes before slicing and building your sandwich.
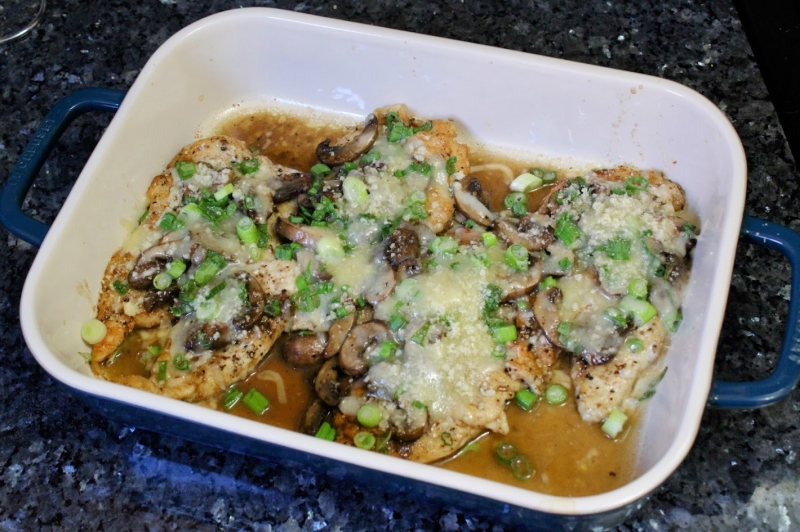
Sandwich assembly: spread a liberal amount of the spinach and artichoke dip mixture on the bottom of the roll. Be sure to spread the dip evenly, all the way to the corners.
Place the bottom and top of the sandwich roll under a broiler in your oven set to high. My toaster oven takes about 5 or 6 minutes for the dip to start to turn a little brown, but your oven might be different. Just make sure to keep checking the appearance of the bread and dip often because broilers can burn your food very quickly.
Once the dip layer is toasted to your liking, remove everything from the broiler and top the melty dip with slices of your chicken breast.
Top the chicken with pickled peppers and close the sandwich.

Panini version
I also tried this same sandwich in a panini press, prepared similarly to how a Cubano sandwich is made. It worked well, but it added extra steps to the process. First, you need to heat up the dip. For me, this happens under the broiler in the normal version of this sandwich, and you can do it that way here too. But then you must assemble and then cook the sandwich in a panini press to finish the sandwich. I personally don’t think it’s worth the extra work, but it’s an option.

Check back next week for more sandwiching
Pretty sure next week’s sandwich will be cooked in a wok. Or at least it could be cooked in a wok. You’ll have to come back to find out. Or you can join the Bounded by Buns Patreon to know in advance.

0 comments on All dip no chip