In this blog post, I get about as close to being a meal prep blogger as I can get. This is my attempt to create a sandwich concept where you can store both the bread and the chicken components in the freezer until it’s time to eat. Thirty minutes later, with a little time in the oven, a tasty sandwich is ready. This is my buffalo buttermilk blue cheese chicken biscuit sandwich, and I still have one left in my freezer for later. You could too.
What is this sandwich?
This sandwich is an attempt by me to create a sandwich where you can cook the chicken component and the bread component at the same time and temperature on the same pan. Is this something that everyone needs? No. Is this a thing that some people might enjoy reading about? Hopefully. I don’t even know anymore. I just make sandwiches and write about the adventure.
I covered a one-pan chicken and biscuit sandwich—back when I was writing a whole lot less—near the start of this sandwich blog, but I recently saw a random Instagram post that reminded me of the concept.

One-pan fried* crispy chicken biscuit
This sandwich blog post conceptualizes the strategy of a crispy Panko-coated chicken thigh and a buttermilk biscuit that can be baked at the same time and temperature on the same sheet pan. Creating an easy clean-up, crispy chicken biscuit sandwich experience.
*baked in an oven
My original one-pan chicken biscuit sandwich used chicken thighs, pounded into a thinner shape, but the one I’m writing about today uses ground chicken that is seasoned and frozen into patty shapes. Then you can coat them in Panko and cook them immediately, or you can freeze the patties until you’re ready for sandwiching.
One-pan chicken biscuit sandwich concept
Both the biscuits and the chicken patties can be stored in zip-top freezer bags for up to a couple of months (or maybe longer), and they will be ready to go as soon as your oven gets pre-heated. This means you can prep them on an otherwise boring Sunday afternoon and have five or six lunches in the freezer for later.

Because I wanted the sandwich to be a bit more complicated than just a piece of chicken and a biscuit, I also added blue cheese to the biscuit dough and ended up whipping up a quick two-ingredient buffalo sauce to coat the crispy chicken patty with. Because everyone knows that buffalo sauce plus blue cheese adds up to a fun time.
Now that we know what we’re doing, we need to start with some biscuits.
BUT, FIRST, I tried this concept with a homemade burger bun
And it sort of worked.
In concept, this should be the same as cooking a biscuit at the same time as the chicken patty. But the issues arise with time and temperature. First, a burger bun requires rising and proofing time that can be sort of unpredictable, and it takes more than 2 hours from start to finish. Because of the living yeast, you can not freeze burger bun dough and have it perform in the oven as you’d expect. Then there’s the fact that a burger bun typically is cooked at a considerably lower temperature than biscuits.
My biscuit recipe cooks at 475 F (245 C) for 15 to 20 minutes, and my typical bun recipe takes place 100 degrees cooler at 375 F (177 C) for 15 to 20 minutes. So now we need to adjust the oven temperature in one direction while still being able to cook the chicken patty to a point where it’s got some exterior crispiness, and it’s not raw in the middle.
I did a test of one bun baked at 450 F, and it cooked FAST and dark. Then the next day, I whipped up a dough recipe for 2 buns, and I baked those at 400 F along with a chicken patty (that you’ll read about a bit further down the page), and it worked ok. The buns cooked faster than the chicken, but I removed them to cool while the chicken finished.


Again, this worked ok. The main issue is that you’re not supposed to slice a bun right when it comes out of the oven. The main reason that you should let bread rest is that the middle doesn’t stop cooking the second you remove it from the oven. There’s carryover cooking time, and if you slice it immediately, the middle of the bun can be fully cooked by temperature, but it’s still a bit soft and gummy.
The sandwich still worked, though. It just wasn’t very convenient.
I still enjoyed it, and to complete the sandwich, I created a small salad of red onion and lettuce tossed in a store-bought sweet poppyseed dressing as the fresh component/condiment.

Due to the temperature adjustment issues, the chicken did not get the level of browning I got with the one-pan chicken biscuit process. Overall, this was a success, but not one that I want to share with a full recipe, nor do I really want to try this again. The biscuit version is massively better on paper and in practice, but I’m glad I tried.


Baking a bun and cooking the chicken patty at the same time was just fine. I wouldn’t suggest it, though, because you shouldn’t be cutting your buns as soon after baking as I did, and also, it’s sort of a bitch to handle all the timing related to the process for this sandwich. If you want to go the bun route, just cook them separately, or you could obviously just have store-bought buns and use the chicken patty technique to make great, easy chicken sandwiches.
The biscuit option is just so much better suited to the one-pan idea than a yeasted burger bun.
Now, it’s finally biscuit time. Let’s go.
Blue cheese buttermilk biscuits
This is just my regular buttermilk biscuit recipe, plus 2 to 3 ounces of blue cheese crumbles. I did not create a new stand-alone recipe for these biscuits, but I did put the blue cheese additions into the full one-pan, buffalo chicken biscuit recipe down below. But if you wanted to recreate these biscuits on their own from my buttermilk biscuit recipe, I simply folded some blue cheese crumbles into the dough.
You don’t really need any more instructions than that. You could mix the blue cheese right into the original dough, but I just crumbled blue cheese into 2 folds of the biscuit dough.


The process for baking the biscuit and the chicken patty at the same time can happen right on a sheet pan, but I like to use parchment and foil for the two different components. I typically bake biscuits on parchment paper to help with cleanup and also to make sure that nothing sticks and the bottoms of the biscuits cook consistently from batch to batch. So for this one-pan process, I fold a piece of parchment slightly larger than my biscuit and bake the biscuit on top of that.
The chicken patty is baked on top of foil, so that it’s easy to move and it also will not stick to the pan, and if you’re careful, your pan will require just a quick scrub at the end during clean-up. You may be afraid of getting burned, but aluminium foil cools so quickly that as long as it’s not folded over many times or balled up, it will be cool to the touch even after 20 minutes in a 450 F oven.


Here’s my tried and true buttermilk biscuit recipe, and as I said, you can easily convert this recipe to a blue cheese-focused biscuit with the addition of about 3 ounces of crumbled blue cheese right in with the dough. Blue cheese doesn’t add much to the biscuit in terms of appearance, but when eaten on their own, these biscuits smell and taste like they have that expected blue cheese funk. It’s a fun twist on a classic you could add to your next sausage-and-egg biscuit if you’d like.

Buttermilk biscuits
Adapted from Southern Living's best buttermilk biscuits recipe. This is a super easy biscuit recipe, requiring only three ingredients plus a pinch of love.
Get RecipeChicken patty
For the chicken patty, I seasoned some store-bought ground chicken with garlic powder, onion powder, black pepper, salt, sugar, and MSG to create what is effectively the same blend I would use in a chicken nugget or a fried chicken patty sandwich. I baked these breadcrumb-coated patties, but you can follow the same process I describe here and then fry the patties in hot oil if you want. That will lead to a much crispier chicken patty, but you can’t make those in one sheet pan along with a biscuit as I show you how to make in this recipe.
I used 1/4 pound patties for these sandwiches, which were honestly too large for me. In the recipe, I suggest splitting each pound of meat into 5 portions instead of 4, which will end up with around a 3.2-ounce pile of ground chicken.


Once the meat is seasoned and portioned, I formed them all into rough “chicken filet” shapes that were between a quarter and a half inch thick. I formed the patties on parchment paper on sheet pans and then stuck them in the freezer for an hour and a half, and then I breaded them before putting them back in the freezer to fully firm up. The first round in the freezer is so the patties are solid enough to stand being dunked in the breading, and the second round in the freezer is meant to make the breaded patties firm enough so that I can remove them from the sheet pan and add them to a plastic freezer bag for storage.
The breading process is exactly like I would do it if I were frying the chicken patties. First, they get fully coated in all-purpose flour, which will help the egg wash stick to the exterior. After the egg wash, the patties are coated in seasoned Panko bread crumbs and placed right back on the parchment-lined sheet pan. After all patties are breaded, place them in the freezer for 2 to 3 hours before they fully solidify so you can zip them up for extended storage.


When it’s time to bake, spray the chicken patties with cooking spray or sprayable avocado oil and bake on aluminum foil. Cooking on foil makes it easy to move the chicken filets off the sheet pan when they are fully cooked. If you open the oven after 18 minutes and the biscuit doesn’t look browned as much as you’d like, you can easily scoop under the foil and slide the chicken off and put the pan back in the oven to fully finish the biscuit.
Can aluminum foil burn you?
The simple answer is yes. But when it’s flat, in sheet form, it’s very difficult.
Aluminum foil, when baked in an oven, single ply or even double ply (folded over on itself once), has a low volume to surface area ratio, which means it will heat up and cool down extremely quickly. If you touch foil when it is hot, the heat that is stored in the aluminum will transfer to your fingertips, which have a fairly high capacity for heat. You’ll think that the aluminum is cool to the touch, but in reality, you just cooled it off with your skin.
Because of this, you can pretty much touch and handle a sheet of aluminum foil with your bare fingers, right out of the oven. Don’t try this with balled-up aluminum foil, though. Also, you probably shouldn’t listen to a person who writes about sandwiches on the internet when it comes to safety. Be careful.
You can eat your chicken biscuit just like this if you want, or you can step it up into the buffalo chicken version as I explain just below.
Because I made a whole batch of biscuits and 6 chicken patties, I had some leftovers and created this simple chicken biscuit with a little bit of homemade honey mustard that turned out a bit thinner than I expected—possibly due to the hot chicken.

If you’d prefer to try the one-pan chicken biscuit technique but you’d rather use a whole piece of chicken instead of a chicken patty, I have a recipe for that as well. Note that this technique uses chicken thigh pieces, and it does not have tips for storing those in the freezer. You need the chicken thighs to be at fridge temperature and not frozen, or they will not cook all the way through.

One-pan crispy chicken biscuit
All of the taste and excitement of a fried chicken biscuit sandwich without all the messy frying part. Oven-baked panko coated chicken thighs cook at the same time and temperature as my biscuit recipe making this an easy one pan meal. The biscuit recipe is based off of Southern Living's buttermilk biscuit recipe.
Get RecipeBuild the buffalo buttermilk blue cheese chicken biscuit
You can spend some effort making a buffalo sauce with minced garlic or garlic powder, honey, spices like paprika and cayenne pepper powder, or you can do what I did for this sandwich and just make it with melted butter and hot sauce. You can simmer this in a small pan, or you can actually microwave it if you need to move quickly.
Part of the point of this sandwich blog post is to show an easy way to prep frozen biscuits and frozen chicken patties so that you can quickly create a meal, so in my opinion, this was the perfect time to use a buffalo sauce that requires very little effort.
For me, it was very little effort to make this sauce in a small pot. When the biscuits come out, I like to baste the tops with melted butter, so that’s what I did. I started butter on the stove until it melted. Used a bit of that butter to paint on top of my biscuit that just came out of the oven. Then I added a liberal amount of hot sauce—in this case, Franks brand hot sauce—to the pot and warmed that until everything was hot and combined. Then it’s just a matter of painting the sauce on top of the cooked and crispy chicken patty, and the sandwich is pretty much complete.


Here’s the simplest buffalo sauce recipe you can make. But I have all of this covered in the full sandwich recipe down below.
Buffalo sauce
10 minutesCan you make buffalo sauce in the microwave?
Yes, you can. Or you can just buy pre-made buffalo sauce at the grocery store. Just don’t put it on a hot piece of chicken without warming it up first.
One-pan buffalo buttermilk blue cheese chicken biscuit photos and recipe


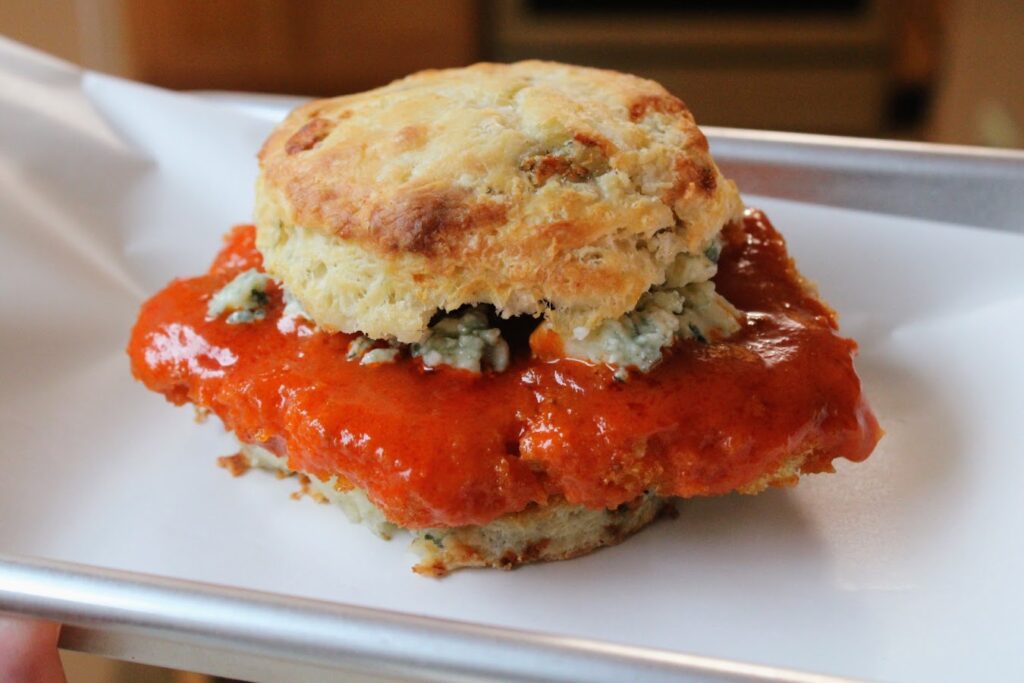
One-pan buffalo buttermilk blue cheese chicken biscuit sandwich

This crispy and flavorful sandwich combines two components that can be prepped in advance and then stored in the freezer until it's time to eat. Both the biscuit and the chicken patty can be baked directly from frozen at the same oven temperature, producing a hot sandwich topped with a simple buffalo sauce and creamy blue cheese crumbles.
Ingredients:
Blue cheese buttermilk biscuits- 2.5 cups self rising flour (300 grams)
- 1 stick of frozen butter (grated - 4 ounces/113 grams)
- 1 cup cold buttermilk (224 grams)
- 2 ounces blue cheese crumbles (plus more for the finished sandwich)
- 1 to 1.5 pounds ground chicken meat (thigh or breast or a combination of the two)
- 1 teaspoon granulated sugar
- 2 teaspoons salt
- 1⁄2 teaspoon garlic powder
- 1⁄2 teaspoon onion powder
- 1⁄4 teaspoon MSG (optional)
- 1⁄2 cup all-purpose flour
- 2 whole large eggs
- 1 cup Panko breadcrumbs
- 1 teaspoon paprika
- 1 teaspoon salt
- 1⁄2 teaspoon black pepper
- 1 frozen, raw buttermilk blue cheese biscuit (from above)
- 1 frozen, chicken patty (from above)
- 2 to 3 tablespoons butter
- 1⁄4 cup hot sauce
- blue cheese crumbles
Directions:
Biscuits: measure or weigh your flour. Grate frozen butter into the sifted self-rising flour. Stir to combine until the butter is fully coated with flour.
Put the bowl in the freezer for 10 minutes. It's important to keep the butter as cold as possible through this process.
Sprinkle the blue cheese crumbles into the flour and butter, and then combine the buttermilk with the cold flour/butter to bring it together as a dough. Stir no more than 15 times. Overworking the dough at this stage could cause your finished biscuits to be tougher. Your dough at the end of 15 stirs will be very shaggy and not smooth at all.
On a floured surface, dump out the dough and roll it with a rolling pin. If you don't have a rolling pin, you can just use your hands. Dust with flour as needed when the dough gets sticky. Fold the dough over on itself five different times. This folding process is what creates the layers in the biscuits.
Roll or flatten the dough to 3/4 to 1 inch thick/tall.
Cut biscuits into circles or squares and place on a parchment paper-lined baking sheet. When cutting, you do not want to twist the cutter. Twisting while cutting will ruin the layers that you created with folding. Place your cut biscuits on the sheet pan. After cutting biscuits, you can grab any scraps of dough and reroll and re-cut them. There's no need to waste any dough. The last few biscuits might not look as uniform as the first ones, but they will all taste the same.
Freeze the biscuit dough for 2 to 3 hours, and then each biscuit should be firm enough that you can transfer them to a freezer bag for up to 2 months.
Chicken patties: grab a small bowl and pour 1/2 to 1 cup of water into it. You will be using this to dip your hands/fingers in while you're shaping patties, and the water helps your hands not to stick to the chicken as much.
In a large bowl, add ground chicken, sugar, salt, garlic powder, onion powder, and MSG (if using). Wet your hands and use them to mix up all the chicken and spices. Your hands are the best tool for this, and you will have to use them again in shaping your patties.
Once everything is combined, it is time to shape. Split the ground chicken mixture into 3 to 4-ounce equal-sized portions. A pound of meat should create about 5 patties.
Line a sheet pan with parchment and spray with non-stick baking spray if you want. This will help the patties not stick to the surface as much, but it's optional. Take one portion of the chicken mixture and scoop it onto the parchment. With wet hands, you can shape the chicken mixture into a 7-inch by 3-inch rectangle. Do this for all 4 portions of the chicken mixture. I found that you'd want your raw chicken patties to be about a quarter to a half inch thick.
Once your patties are formed, they need to go into the freezer to firm up. You can freeze them for an hour, and then it's time to bread.
Chicken patty breading: set up your chicken dredging station. You will need three bowls or large plates for this.
The first bowl will contain all-purpose flour. Add 1/2 teaspoon salt and 1/2 teaspoon black pepper to the flour. The second bowl will contain 2 whole eggs whisked thoroughly. The third bowl will have Panko breadcrumbs, 1 teaspoon salt, 1/2 teaspoon black pepper, and 1 teaspoon of paprika. Whisk to combine.
Working one patty at a time, carefully coat it in the seasoned flour, then into the whisked egg, and finally in the seasoned Panko bread crumbs. During each step, make sure the patty is fully coated. When you are done, place each patty back on a parchment-lined sheet pan and put that back in the freezer for 2 to 3 hours. At this point, your patties should be very firm, and they can be packaged in a freezer bag for longer-term storage (up to a couple of months).
Sandwich baking: when it's time to bake a chicken patty and a biscuit, preheat the oven to 450 F (230 C).
Place a biscuit on a sheet pan on top of a piece of parchment paper. Place a chicken patty on top of a piece of aluminum foil. Using cooking spray or sprayable oil, spray both sides of the chicken patty fairly liberally. The spray should help the chicken to darken and brown during the cooking process.
Once the oven is preheated, bake the biscuit and chicken for 8 minutes, then remove the pan and carefully flip the chicken patty. Spray the top of the chicken patty again with cooking spray or oil, and then place it back in the oven for an additional 8 minutes. Remove the pan and take the chicken patty from the pan to a plate to rest. If you think the biscuit is browned enough on top, you can remove it too, or you can place the pan back in the oven for an additional 3 to 4 minutes while the biscuit finishes browning.

While the biscuit is finishing cooking, place 2 tablespoons of butter into a small saucepan over low heat.
When the biscuit is browned to your liking, remove it from the oven and carefully paint some of the melted butter on the top. Once you have painted on some butter, add the hot sauce to the pan with the melted butter. Cook for 1 to 2 minutes while stirring to make sure the hot sauce is incorporated into the butter.
Spoon some of the buffalo sauce on top of the resting chicken patty. Split the biscuit in two and add the buffalo sauce-coated chicken patty in between the two halves of the biscuit. Add some crumbled blue cheese on top of the chicken and close the sandwich.
Serve and enjoy.
Notes:
You can freeze a batch of biscuits prior to baking, and then when you want to make just one or two biscuits, you can bring them out and cook (still frozen) at 475 degrees F for about 15 minutes. You will want to check around the 12-minute mark and keep an eye on them to see if they are browning fast enough.
If you do not have self-rising flour, you can use all-purpose flour, salt, and baking powder at a rate of 1.5 teaspoons baking powder + 1/4 teaspoon salt to each cup of flour. For this recipe, that would be:
- 1 tablespoon + 3/4 teaspoon baking powder (17 to 18 grams)
- a heaping 1/2 teaspoon salt (2 to 3 grams)
- 2.5 cups of all-purpose flour (300 grams)
Mix the flour, baking powder, and salt together before adding butter.
Check back next week for a non-sandwich
It’ll be sandwich-adjacent, though, and it’s a great and fairly simple option for breakfast or a lazy brunch. If you need another hint, I’ll be writing about a menu item that’s a big deal in Austin, Texas, which is a place I’ve never been. We’ll travel together in our own kitchens.


Maggie says:
brilliant tip to know I can freeze uncooked chicken patties, possibly life-changing!
Simon Varwell says:
I will never get over Americans putting savoury things in a scone.
Jonathan Surratt says:
Don’t knock it till you’ve tried it!
Simon Varwell says:
I did once and it was very unsettling!