
For the entire month of January, we will be celebrating what I have named Meltuary: a celebration of all things cheesy and melty.
The last sandwich of #Meltuary is a good one, but more than just writing about this sweet and slightly spicy melt, I’d like to present the things I’ve learned from making FIVE different cheesy sandwiches this month.
The sandwich I’m writing about is melty cheddar/Jack cheese with, super flavorful and tender short rib meat and pickled red onions. But before we get into the sandwich, here are the tips for making better melts that I wanted to share. If you’re just here for the sandwich, click the link below.
Jump past all the learnin’ and get straight to sandwich content.
Thoughts and tips from Meltuary
1. Shred your own cheese
You don’t always have to use shredded cheese in your melts, but it often seems to melt more consistently.
I’m not trying to get all healthy on you here, but if you buy pre-shredded cheese, you’re not just buying cheese, you’re also buying anti-caking agents that the cheese manufacturer adds to make sure that the shreds don’t clump up. These preservatives do not help with melting, and you definitely don’t need these extra starches in your sandwich.
It’s not hard to shred your own cheese, and you’ll find a lot more options for cheese flavors if you’re ready and willing to use a cheese grater to accomplish the task. Get yourself a good grater and a block of cheese and shred.
2. Heat up the internals first
If your melt has an addition of meat or vegetables that are already cooked, it’s helpful to add those ingredients to the sandwich when they are already hot. Your goal here is to end up eating a hot sandwich and it certainly doesn’t hurt to introduce hot ingredients into the middle with the cheese. This will help the cheese in the sandwich to get melty faster.
If you are using something like pre-cooked chicken, deli meat or pepperoni, all you would need is 2 or 3 minutes in a hot pan and those meats will be sufficiently warmed and ready to lend a hand to heat the cheese.
3. Introduce acid/vinegar to counterbalance all the cheese
If you do it right, a melt is full of cheesy goodness. That’s a great thing, but if you want to have a little balance in the sandwich, add something pickled or acidic to counterbalance the rich cheese. This could be an ingredient like dill pickles, sauerkraut, or acidic mustard. Many hot sauces are also heavily vinegar based which will do the trick as well. Try only a small amount at first because just a small amount will go a long way to create balance.
4. Season all parts of the sandwich even the outside
You should be seasoning everything you cook already. In a couple of sandwiches that I made during #meltuary, I even seasoned the outside/bread part with a compound butter or seasoning blends on the outside of the melt.
Even if you’re not seasoning the outside, make sure you’re grilling/griddling your sandwich with butter, mayonnaise, or olive oil on the outside of the sandwich to add extra flavor and texture to the bread.
5. Slow and low griddling
A grilled cheese or a melt benefit greatly from a lower-temperature cooking process. The worst thing that can happen with a melt is for the outside of your bread to be overcooked and dark brown while the cheese on the inside is cold and not melty.
All stove tops are different, but my suggestion is to start the heat at a little below medium and see where that takes you. It might take a little longer to make your melt, and you will possibly have to flip a few extra times to get the bread to golden brown and toasty, but it will be worth it in the end.
6. Use a pan/pot lid or inverted metal bowl to steam the sandwich and melt the cheese
Whenever possible, I like to build my melts or grilled cheeses open-faced in the pan. When I can do this, I will cover the pan with the lid or if I’m using a larger griddle, I will cover the bread with a metal bowl. This just exposes the middle parts of the sandwich to the steamy heat and speeds the meltiness along.
You can see in this photo that I like to use bowls from a fairly cheap stainless bowl set on our griddle if I’m using that. These bowls aren’t easy to pick up when they get hot, so you’ll likely need a set of tongs and maybe a spatula, but if you are cooking on a flat surface they work well.
If you’re cooking your sandwich in a pan, just use the lid or if the pan you’re using doesn’t have a lid, you could always cover it with a metal sheet pan.

7. Rest your melts on a rack
An important #meltuary tip to remember is that when you remove your sandwich from the pan, it is still cooking. It is hot and if you immediately place it on a plate or cutting board and leave it for a minute or two the bread will start to steam itself and become soggier and soggier.
Take the sandwich off the heat and immediately place it on a cooling rack to rest briefly. This rest time will give the bottom of your sandwich enough time to cool slightly and stay crisp. If you don’t have a cooling rack, you can place the sandwich directly on the racks of your turned off oven or you can take two or three small pieces of aluminum foil and roll it up or ball it up to fashion a way to lift the sandwich off a flat surface.
Resting just a minute or two will help a great deal to keeping your bottom slice of bread crisp.
Sweet sriracha bourbon short rib melt
Now, let’s apply some of these tips and make our last #Meltuary sandwich. This week I bought beef short rib meat and braised it in a flavorful sauce as the main addition to the melt. First, as always, we need some bread.
Pullman loaf
This week, I baked my simple white Pullman loaf recipe. If you’ve been reading my posts for a while, you’ve seen these rectangle loaves before, but basically, a Pullman pan is a rectangle loaf pan with a slide-on lid. You slip the lid on right before baking and the dough rises to fill in all the corners during the baking process. If you allow for enough time for the dough to rise, you’ll end up with a rectangular brick-shaped loaf of bread as you’ll see below.


This loaf as pictured above is cooling upside down. Since the bread bakes right side up, it will start to sag in the middle and if you then remove it from the oven and the pan and allow it to rest and cool right side up, the sag will become even deeper. Resting it upside down, reverses some of the initial dip and sagging on the top of the loaf and leaves you with a more squared-off slice of bread.


Here’s my simple Pullman loaf recipe. This is just an easy-to-bake white bread recipe that works very well with most cold-cut-style sandwiches.

Pullman loaf bread
A soft white loaf with square slices that are perfect for grilled cheese or Texas toast. Slice as thick or as thin as your sandwich situation requires.
Get RecipeCheese selection
Since I really wanted to focus on the short ribs and the sauce they’re braised in, I went with a very mild cheese in these melts. Most were made with shredded marble Jack, but I did shred up some cheddar in one or two versions.
Remember tip #1 from above: shred your own cheese!
Short ribs

I made and wrote two (one and two) other short rib recipes for this site back in 2021. This recipe is a slightly adjusted version of the BBQ short ribs that has additions of bourbon and sriracha.
This is sort of like a barbecue sauce with a hint of bourbon and sriracha. There’s not so much sriracha in the braising sauce that it’ll be overly spicy, but there’s just enough that it peeks through and cuts some of the sweetness.
The short ribs braise for around three and a half hours but other than that, there’s very little work involved in the process. You may have to cut the short rib meat to fit inside your pan, but otherwise, you simply make the braising liquid and place everything in the oven.
These short ribs would be great with some mashed potatoes on the side and then any leftovers could be applied to a melt for lunch.
Pickled red onions

Pickled red onions work well in this sandwich because they bring vinegar and sharpness that cuts through a lot of the sweet flavors in the short ribs. There’s also a lot of creamy richness from the cheese that the pickled red onions will contrast with, making the sandwich flavor experience much more interesting.
Pickled onions take about 5 minutes to whip up–although they get better with a little time in the fridge–so they seem like something that you could easily keep stocked in your refrigerator quite often.
These are great on many types of sandwiches, but they’re also a solid addition to tacos, burritos, or quesadillas. You should commit the recipe to memory so that you can pull it out and impress your guests at your next nacho party.

Pickled red onions
Pickled red onions are a tangy and slightly sweet addition to a sandwich that will add texture and crunch. This is a super easy and quick recipe that will add a big flavor bang to your next sandwich.
Get RecipeSweet sriracha bourbon short rib melt
Below are a lot of photos and the recipe for this cheesy, beefy melt.


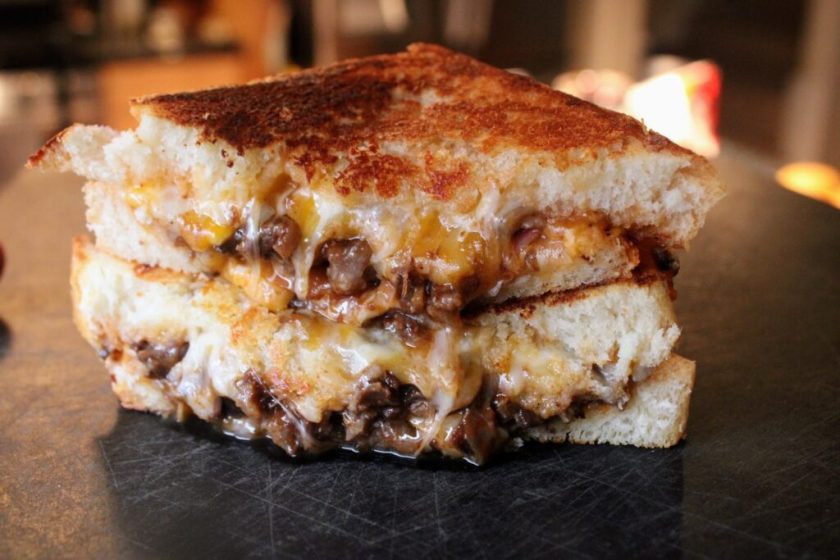
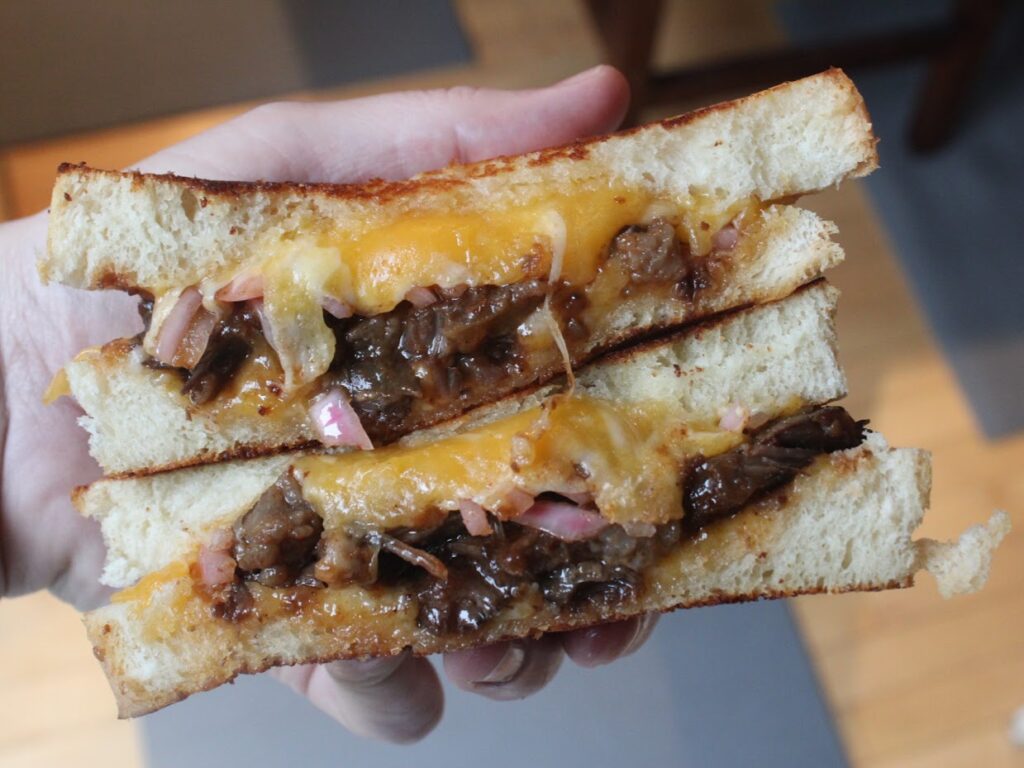


Sweet sriracha and bourbon braised short rib melt

A melty and meaty sandwich with pickled onions that will slice through the richness of the cheese.
Ingredients:
Sweet sriracha bourbon short ribs- 2 pounds beef short ribs
- 2⁄3 cup dark brown sugar (light brown will substitute)
- 2⁄3 cup ketchup
- 2 tablespoons apple cider vinegar
- 1 tablespoon sriracha (double this for extra spice)
- 1 tablespoon bourbon
- 1 tablespoon Worcestershire sauce
- 2 teaspoons Dijon mustard
- 1 teaspoon paprika
- 1⁄2 teaspoon garlic powder
- 1⁄2 teaspoon onion powder
- 1⁄2 of a large red onion, thinly sliced
- 1⁄2 cup red wine vinegar (or white wine vinegar will work)
- 1 teaspoon granulated sugar
- pinch kosher salt
- pinch MSG (optional)
- 2 slices of bread
- 1 to 2 tablespoons butter
- 2 to 3 ounces cheddar or Monterey Jack cheese, shredded
- 2 hearty spoonfuls of short ribs (from above)
- pickled onions (from above)
Directions:
Short ribs: cut short ribs between the bone until they are small enough size to fit into a baking dish.
Combine brown sugar, ketchup, apple cider vinegar, sriracha, bourbon, Dijon mustard, Worcestershire sauce, paprika, garlic, and onion powders in a mixing bowl and whisk to combine.
Pour your sauce into a baking dish and nestle your short ribs in the sauce, flipping them over a few times to ensure they are coated.
Preheat your oven to 300 degrees.
Cover your baking dish with aluminum foil and bake short ribs for 3 hours, removing the foil after 2.5 hours so the meat will brown. You can cook these for an additional 30 minutes if you want even more tender meat.
Let the meat cool for 10 minutes and then remove all of the bones from the meat. You can shred the meat up at this point or do it later when you are about to build your sandwich. After the bones are removed, you can build your sandwich immediately or if you want to eat it later you can package the short ribs and sauce in the fridge.
If you eat it later, you will probably want to skim off some of the fat left behind from the ribs in the sauce. Let the sauce sit for a few minutes and the fat will come to the top and you can strain it off with a spoon. If you let the sauce cool fully, the fat is much easier to see and skim and remove.
Pickled red onions: slice a large red onion through the stem/root. Remove peel on one half and thinly slice. Save the other half of the onion for another recipe.
Add your thin slices of onion to a bowl with the rice wine vinegar. Sprinkle with granulated sugar, a pinch of kosher salt, and a pinch of MSG if using. Stir everything together and leave on your counter for at least an hour, stirring occasionally.
At first, all the onions will not be inside the liquid, but as things soften and the onion releases more liquid, everything will eventually become submerged.
Add to a container with a lid and store in the refrigerator for a couple of weeks.
Sandwich assembly: place a medium pan over medium heat.
Add butter to one side of both slices of bread. Place each slice, butter side down into the pan.
Add shredded cheese on top of both slices of bread and cover the pan for 2 minutes to help the cheese start to melt.
Add a few spoonfuls of short ribs and pickled onions on top of the cheese on one slice of bread and then carefully flip the other slice on top to create the sandwich.
Grill the sandwich until both sides are golden brown. Start with 2 minutes per side and then flip. Keep the lid on the pan when you can so that the steam will help to melt everything. Once both sides of the sandwich are golden brown, remove it from the pan and allow the sandwich to rest on a rack for 1 to 2 minutes.
Serve and enjoy.

Say goodbye to #Meltuary!
I think I might take a break from cheese for a bit. Until next week, that is…
Check back next week to see where we end up.

