
My one-week-long muffuletta sandwich adventure stretched into at least two weeks. At the beginning, I figured it would be a fairly easy one, but little did I know that coming up with a solid muffuletta bread loaf recipe would take as many attempts as it did.
We’re making muffulettas that are as traditional as we can and then we’re also inventing a new sandwich called The Buffuletta™.
But first, we need to get a baseline for the muffuletta-style of sandwich and work through what a good muffuletta is and then we need to make one for ourselves. We’ve got some work laid out for us, but you and me, I think we can handle the task.
This week’s sandwich blog post was suggested by Will Gordon, a Patreon of the site. The new plan going forward (for as long as it lasts) will be for me to try to make a sandwich once a month or so from a suggestion from one of my supporters from Patreon.
Will searched through my Master Sandwich List and was shocked that I’d never made a muffuletta before and then he dared me to make one. So, I did. Thanks, Will!
Join us over on Patreon and hopefully I’ll write about your sandwich one day.
What is a muffuletta?
Muffuletta is two things. It’s a Sicilian-style sesame seed-coated bread AND it’s also a sandwich that was invented in New Orleans. According to many reports, an Italian immigrant from Sicily named Lupo Salvadore opened Central Grocery in New Orleans in 1906 and soon after introduced the world to the muffuletta.
If you want to know more about what’s inside a muffuletta, first you need to know that it’s usually a massive sandwich. The bread that the sandwich is built on is typically pizza sized in diameter, sometimes as big as 14 inches across. Then the bread is sliced across and after the sandwich is built, it is sliced into halves and quarters and if it’s big enough sometimes it’s sliced into eighths.
Inside this massive sandwich, you typically have mortadella, salami, and sometimes ham as the meat selections, and then it’s usually sliced provolone and/or Swiss cheese as well as an “olive salad” that really ties the whole thing together.
If you want to read more about the muffuletta from a renowned International sandwich expert, go on over to the Sandwich Tribunal and read about Jim’s experience making New Orleans’ 1st or 2nd favorite sandwiches.
If you’re totally new to muffulettas, one thing that’s important is that they’re put together and assembled when all ingredients are cold or at room temperature. The sandwich itself is then served cold or at room temperature, like other deli sandwiches, and you should expect that if you order one. But what you should be aware of is that this sandwich can hold up to multiple hours or even a day or two in the refrigerator.
Edit: I’ve been informed that occasionally a muffuletta is served warm.
Napoleon House in New Orleans is an example where their muffuletta is warm. Thanks to Nicola Miller for the tip!
During my testing for this blog post, I ate fresh muffulettas and I ate pieces of muffulettas that were two days old, straight from the refrigerator. I think this sandwich benefits from an hour or even more spent wrapped up in parchment or plastic wrap in the fridge. This makes the muffuletta a really good sandwich for a picnic.
Since we’re going to make these, I went out and tried a local muffuletta that I knew would be a good representation of the sandwich-style.
J.P. Graziano’s muffuletta
I’ve written about J.P. Graziano Grocery before and if you’re looking for solid sandwich recommendations in Chicago they’re always at the top of the list. Until I started this particular sandwich journey, I had never tried their muffuletta and figured now was a perfect time.
Spoiler alert: it’s great. There’s plenty of meat, a very savory muffuletta olive salad, and the bread is chewy and not too thick.
J.P.’s menu states that the muffuletta is served on a D’amato’s sesame roll, which is the same great local-to-Chicago bread company that makes the rolls for their subs like the Italian sub that I wrote about near the beginning of this blog.
The J.P. Graziano muffuletta also contains their own house made (and packaged) muffuletta, olive mix in a mild version, and a hot version. I can vouch for these and if you’re looking to skip a step and you’re craving muffulettas at home, this is a good option, and they will ship directly to your house. If you still have some money left over, buy some of their giardiniera for your next pizza night and you can thank me later for the suggestion.
J.P. Graziano’s muffuletta photos
As usual, I took a few photos of the sandwich I got at J.P. Graziano’s. It was a big boy and for me, was too large for one meal. You could easily turn their version into a meal for 3 or maybe even 4 people if you had some chips or side dishes to accompany the sandwich. But, because this is a muffuletta and it’s the type of sandwich that can spend some time in a refrigerator, I turned it into lunch for two consecutive days.


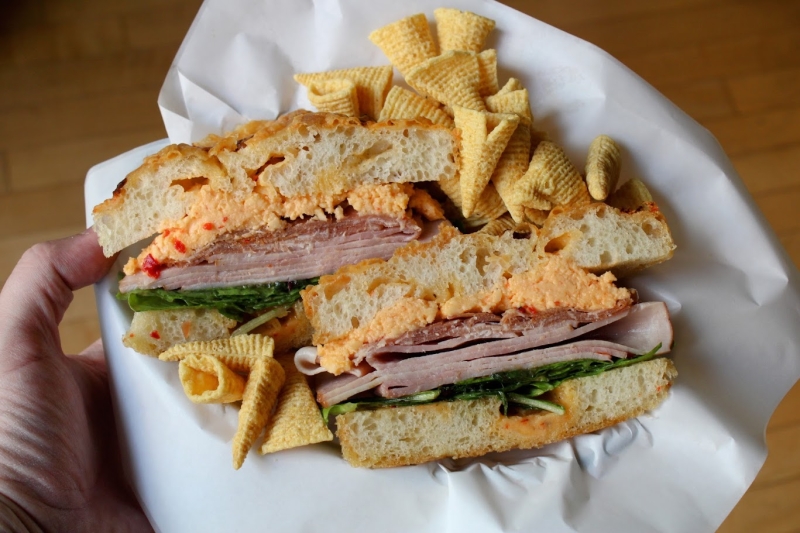
Below are two photos taken on the same day of J.P. Graziano’s muffuletta and one of the versions I made. I was still testing my bread at this point and mine was still a little too thick. Also, in my photo, it appears that J.P. Graziano’s sandwich is served on unevenly sliced bread, and I have looked at many other photos of this sandwich and it seems like mine was just sliced a little crooked. It’s hand-sliced bread after all. It was a fantastic sandwich.
A quarter of J.P. Graziano’s muffuletta
This is J.P.’s sandwich on the day I purchased it.

A quarter of one of my muffulettas
This is my sandwich the day after I made it.

I found that the best strategy for olive salad with my recipe was a solid layer of olive salad on the bottom under the meat and cheese and then I drizzled olive oil and red wine vinegar all over the inside of the top bun.
Muffuletta bread
First, I had to tackle the bread in this sandwich. It wasn’t as easy as I was expecting. You really don’t want it to rise up in a round ball like a burger bun or another type of sandwich bun. By the end of my final version of this recipe, I was practically rolling it out thin like a New York-style pizza dough.
The final recipe turned into a 70% hydrated dough, so it was light and airy but still very much able to stand up to oil, vinegar and a bunch of briny olive salad pressed up against the bread.


My first versions ended up with too much dough and not rolled out wide enough. So, I decreased the amount of flour and water for one roll and then made sure it was very thin going into the final rise stage.


Muffuletta bread loaf
An eight-inch muffuletta roll, perfect for one of New Orleans favorite sandwiches. All you need is one of these rolls, some meat, cheese, and olive salad and you'll be in business.
Get RecipeOlive salad
The olive salad is a massive part of what makes a muffuletta such a popular sandwich. The olives are joined with garlic, and pickled vegetables, like giardiniera and capers, and then coated in olive oil and red wine vinegar to create almost a condiment that could be used in all sorts of sandwiches.


Cheese
Traditional muffulettas can be served with slices of provolone or Swiss cheese. I used both. I think the Swiss added a bit of nuttiness that I enjoyed in the sandwich. I used mild provolone, but the J.P. Graziano sandwich is built with just sharp provolone as the cheese option, and I did enjoy that as well. Overall, though, I think the cheese is one of the least important pieces of this sandwich.
Cold cuts
There’s not a ton to say here. Mortadella, genoa salami, and ham were the sliced meats that I chose to use in my muffuletta. This is also what is on the Central Grocery muffuletta as well as what J.P. Graziano uses, so I figured I had to use these three meats.

The sandwiches
The first muffuletta
The first version of my sandwich was just fine. I had a good olive salad mix and obviously, the cold cuts and cheese were just fine, but the bread was too tall for my tastes. You want the perfect amount of bread compared to the amount of meat and cheese and I didn’t nail it on the first attempt.
That’s fine though, we take notes, adjust our recipe and jump back into the process.


Double olive salad
I tried double the olive salad on some quarters of these sandwiches and for me, I think that’s a bit overkill. Don’t do it unless you’re looking for an extra olive-focused sandwich experience.


The second muffuletta
You can see from the two photos below that I was still dealing with too much bread. At this point, I still had the mindset that the muffuletta dough should be shaped like a regular bun. It only makes sense that I was moving in that direction but as you’ll see later, this is what caused me to have dough that was too thick.
What I did nail on this second run through though was that there should be olive salad mix on the bottom (or top) and the other side of the bread should just get olive oil and red wine vinegar to moisten the bun and soak in during an extended stay in the refrigerator.


The final muffuletta
Here’s the last normal muffuletta I made over the past two weeks. It was a better representation of this sandwich since the thickness of the bread better matched the amount of meat and cheese on the inside.


Muffuletta sandwich
This is a super savory and meaty attempt at a muffuletta sandwich. This sandwich is heavy on the olive mix but still has a lot of tang from additions of red wine vinegar with cheese and meat that brings everything all together.
Get RecipeThe Buffuletta
When I’m working on these traditional sandwiches that might be mostly composed of cheese and cold cuts, I sometimes worry that I won’t have enough to write about. In those situations, I often brainstorm other interesting or even wacky versions of that sandwich.
This is how I came up with The Buffuletta.
Fried chicken thighs, drizzled with buffalo sauce, topped with slices of buffalo milk mozzarella and a homemade carrot and celery quick pickle mix.
I thought about adding blue cheese here, but it turns out that the mozzarella more than adds a cooling effect to any heat that the buffalo sauce might contribute. I’m not sure if I’ve ever thought about eating mozzarella with buffalo wings, but this combination really works out in the flavor department.

If you like buffalo sauce and hot wings, you’d love this sandwich. You must first make the bread and you have to fry at least four chicken thighs to get to the final product, so it might not be worth it for everyone, but it really was better than I expected. The quick pickle medley was great as well and incorporated everything into one unit, much like the olive salad does in the traditional muffuletta.


Here’s a gallery of the build process for The Buffuletta. Click any image to jump into a swipable gallery.


The Buffuletta

This is the Buffuletta. It's crispy fried chicken in spicy buffalo sauce, topped with buffalo mozzarella, a carrot, and celery pickle mix all arranged inside of a homemade muffuletta buffuletta bread roll.
Ingredients:
Buffuletta bread loaf- 240 grams all-purpose flour (2 cups)
- 6 grams salt (1 teaspoon)
- 6 grams instant yeast (2 teaspoons)
- 170 grams water (3/4 cup)
- 1 egg white
- 1 tablespoon water
- sesame seeds
- 1 carrot, shaved into ribbons with a peeler
- 2 stalks celery, diced
- 3⁄4 cup apple cider vinegar
- 1⁄4 cup water
- 2 tablespoons sugar
- 1 teaspoon salt
- 1.5 cups buttermilk
- 1 teaspoon salt
- 1 teaspoon black pepper
- 1 teaspoon cayenne pepper
- 1⁄2 teaspoon paprika
- 4 boneless skin boneless skinless chicken thighs (or breast meat cut into sandwich size pieces)
- 2 to 4 tablespoons hot sauce (optional for extra spice)
- 1.5 cups all-purpose flour
- 1 tablespoon salt
- 1 teaspoon black pepper
- 1 teaspoon cayenne pepper
- 1 teaspoon onion powder
- 1 teaspoon garlic powder
- 1⁄2 teaspoon paprika
- peanut oil for frying
- 1 buffuletta roll (from above)
- Buffalo sauce (click for recipe)
- 1 ball of fresh buffalo mozzarella, or a ball of fresh mozzarella
- pickled celery and carrot (from above)
Directions:
Buffuletta bread roll: weigh and add all your ingredients to a large bowl or the bowl of your stand mixer. If you are kneading with a mixer, mix on medium speed for 8 minutes. If you are kneading by hand, you must knead it for around 10 or 15 minutes to get a smooth dough.
Add dough to a lightly oiled bowl and place it in a warm spot in your kitchen. Allow to rise for 1 to 1.5 hours.
After the dough has more than doubled, remove it from the bowl and attempt to shape it into a smooth, round ball. With your hands or a rolling pin, flatten that ball into a flat disk shape that is less than an inch thick and about 8 to 9 inches in diameter. Carefully move this disk to a parchment-lined sheet pan. Cover the dough with a piece of plastic wrap and allow it to rise again for another 30 to 45 minutes.
Near the end of the final rise time, preheat your oven to 400 degrees F (204 C).
Remove the plastic wrap from the dough. Create an egg white wash by adding an egg white and 1 tablespoon of water to a small bowl. Whisk to combine. Paint the top of your dough very well with the egg white wash. Once the dough is fully painted in egg white wash, sprinkle a liberal amount of sesame seeds on top.
Bake the bread for 25 to 30 minutes, rotating the pan 180 degrees at the halfway point.
Allow bread to cool fully before slicing.
Pickled celery and carrot: add apple cider vinegar, water, sugar, and salt to a small pot over medium heat.
Bring mixture to boil while you prepare and cut your carrots and celery and place them in a medium bowl.
When the liquid starts to boil, remove the heat and stir until everything is combined and dissolved. Pour the liquid over the top of your veggies.
Allow the vegetables to cool on the counter and then add them to a sealed container and store them in the refrigerator for up to a month.
Fried chicken: add salt, pepper cayenne pepper, and paprika to buttermilk (add hot sauce if you want extra spice). and whisk to combine. Put chicken in a zip-top bag or bowl with a lid. Pour buttermilk marinade over the chicken and store in the fridge for at least an hour or overnight.
Make seasoned flour by combining flour with all the spices, salt, and pepper in a bowl or pan that is large enough for a piece of chicken to lay flat in the flour.
Remove one piece of chicken at a time from the marinade and dredge in the seasoned flour mixture until thoroughly coated on all sides. Place the fully coated chicken onto a piece of parchment or a sheet pan rack to rest.
Heat 2 inches of peanut oil in a skillet to 350 degrees F (175 degrees C).
Fry each piece of chicken for 6 to 7 minutes or until it reaches 165 degrees internal temperature. You'll probably want to fry for 3 minutes on the first side and then flip it to make sure you're getting the level of browning that you want. Continue cooking on the other side.
After frying, place the finished chicken on a cooling rack over paper towels to drain some of the oil away.
Sandwich assembly: you can either toss the chicken in buffalo sauce or you can just pour the sauce onto the sandwich on top of the chicken. Either way should work about the same. I made sure to slice each chicken thigh on the diagonal to make it a bit easier to eat in the final sandwich.
Slice the buffuletta roll horizontally to prepare it for sandwiching.
Add some buffalo sauce to the bottom roll and then top the sauced bottom roll with all your chicken.
Top the chicken with more sauce unless you already tossed it in the sauce. Top the chicken with slices of mozzarella. Then top the mozzarella with a healthy amount of pickled veggies.
Add the buffuletta roll to the top to complete the sandwich.
Slice into quarters and serve.
The Buffuletta after some fridge time
Just like the muffuletta, I figured I might need to test this sandwich against extended refrigerator time. Also: I couldn’t eat the whole damn thing, so I ended up eating it over multiple days. If anything, I would say that if you plan to make and eat The Buffuletta and you think it will take more than one day it’s probably better to grill the meat rather than bread and fry it.
The breading on the chicken becomes soggy, but the bread is also soggy from the sauce, so you don’t even notice. But any remaining crunch from the fried chicken is long gone. Part of the fact that you don’t notice, and you certainly can’t tell that this cold, day-old chicken was fried in the first place means, that if you plan to serve this sandwich cold (like a muffuletta), just grill the chicken and slather it in buffalo sauce when you build the sandwich.


Check back next week for more sandwich magic
Fairly certain that I’ll be getting down with some meatballs next week. You can support this sandwich blog on Patreon if you want to know what sandwiches are coming next and are interested in inside information about sandwich production at my house!

0 comments on Muffuletta and The Buffuletta™