
Cookout season is upon us! The time is nigh for backyard brats, burgers, hot dogs, and maybe even a smoked meat selection or two. I’m not planning to tell you how to run your cookout or what to prepare for your guests. Instead, I’m here to present an idea for how you can turn any leftovers you might have from these cookouts into homemade crunchwraps.
Read along for the two versions of leftover cookout crunchwraps I made this week.
What the heck is a crunchwrap?
A crunchwrap is something that taco scientists at Taco Bell invented and attempted to patent back in 2004 or 2005. If you’ve never had one, a crunchwrap is basically a blend between a quesadilla and a crunchy taco or a taquito.

The default crunchwrap at Taco Bell is made from a very large flour tortilla wrapped around ground beef, lettuce, tomato, sour cream, and a cheese sauce. Right in the middle of the crunchwrap is a fried corn tostada shell which – in theory – should contribute crunch to the whole affair. The whole tortilla-wrapped package is pressed or seared on a hot, flat surface to crisp up the exterior and warm the interior.
In my experience, the crunchy tostada layer works best if you eat the crunchwrap immediately after it is prepared. If you are traveling from Taco Bell to the place you plan to consume your crunchwrap, I’ve found the crunchy part gets steamed and becomes soft in the paper it is wrapped in.
BUT that doesn’t mean you shouldn’t take the idea and apply it to make great crunchwraps at home. Because you should. And the whole crunchwrapping process is easy as you’ll learn if you continue scrolling.


As you can see, the photos I took of an official crunchwrap supreme look quite different from the Taco Bell promotional photo above. This seems to be an expected issue with fast-food marketing photos. This was my second trip to Taco Bell in the past year for this blog. My last visit was a lot more enjoyable.
What do you need to make crunchwraps?

The main two items you need to have in your pantry to make crunchwraps are large, burrito-sized flour tortillas and small, fried, corn tostadas. You could make your own burrito-sized tortillas and you could fry your own tostadas, but since this is meant to be a use for leftovers, I chose to buy these readily available ingredients at the store.
If you can’t find the big 12-inch burrito size/x-large tortillas, you can get away with using two 10-inch tortillas with one on the bottom and a piece of a second tortilla on top tucked and folded together.
Here’s a video for making a chicken crunchwrap. I’ve fast-forwarded the video for you to the assembly part so you can see what I mean by using a piece of tortilla as a patch to help seal the top. You only need to do this if you can’t find the 12-inch size burrito tortillas at your store.
Big burrito tortillas and tostada shells aren’t the only things you need to make some version of crunchwrap at your house. You’ll also need some sort of meat or protein and probably cheese to help things combine and hold together.
The crunchwrap folding process
I might be covering things in reverse order by writing about folding first, but here’s a gif demonstrating the crunchwrap folding process. I will go into the layering/stuffing process down in each crunchwrap section down below but they both share the same process for forming a seal around all the ingredients. I did it with one hand so you can see that it’s not that challenging.

Just pull up one side to cover and continue pulling up just a little bit more each time until you’ve formed a folded tortilla. Flip the crunchwrap over and the downward gravity of the ingredients will keep the whole thing closed until it’s time to cook.
The Cuban crunchwrap
Last year I wrote about the Cuban sandwich and I had some leftover pork recently and was inspired to turn it into a crunchwrap.
If you have leftover barbecue pulled pork or roasted pork, you can quickly grab the other ingredients for a Cuban sandwich at the store. Some ingredients may already be in your house. For this Cuban crunchwrap, I had some leftover un-sauced pulled pork from making hoisin Hawaiian pork buns and I decided to put that to use here.
I also have another mojo marinated roast pork recipe that would be more traditional on a Cuban, but since this is about using up cookout leftovers that you might have, I wouldn’t expect you to make the recipe from scratch (but you can if you want).
How to layer a Cuban crunchwrap
You can follow the photos below from left to right, in a z-like pattern from top to bottom, just like a comic book. Also: I would totally read a comic book about crunchwraps.

If your cheese doesn’t melt, it’s not the end of the world. You can see the photo below only has some of the cheese that melted. The slice of Swiss chees in the middle is warm but still firm.
You can reheat the pork and ham in a skillet prior to folding and wrapping the crunchwrap if you prefer, but the meat will get warmed through inside the crunchwrap shell.


Cuban crunchwrap recipe
Here’s my Cuban crunchwrap recipe. If you can find the two tortilla-based ingredients, this really can’t be much simpler.

Cuban crunchwrap
The flavors of a Cuban sandwich in a crunchy quesadilla type format. The crunch of the tostada brings extra texture to help recreate the experience of a pressed Cuban sandwich.
Get RecipeThe brat and pimento cheese crunchwrap
The brats and onions
First, we’re going to need some already cooked brats and onions that you have left over from the big cookout yesterday. Don’t tell anyone, but I cooked my sausages inside at 9 am on a Saturday to prepare for this blog post. I didn’t use beer as a normal person might have, I used pineapple juice because I was working on a few iterations of Hawaiian bun recipes and had one of those big pineapple juice cans that you can’t reseal. So, this batch of brats got cooked on an indoor grill pan and then simmered in with the onions and pineapple juice until everything had a good pineapple juice bath.
Sometimes you do weird stuff when you have a sandwich blog.
Anyway, this likely isn’t how you’ll acquire already cooked brats and onions, but the flavors worked pretty well.


Next, you take those cooked brats and slice them up. In theory, since they are leftovers, the brats and onions will be cooled and fresh from the refrigerator. Because of this, I sear the slices in a pan to warm them up and add more texture just prior to building each crunchwrap.
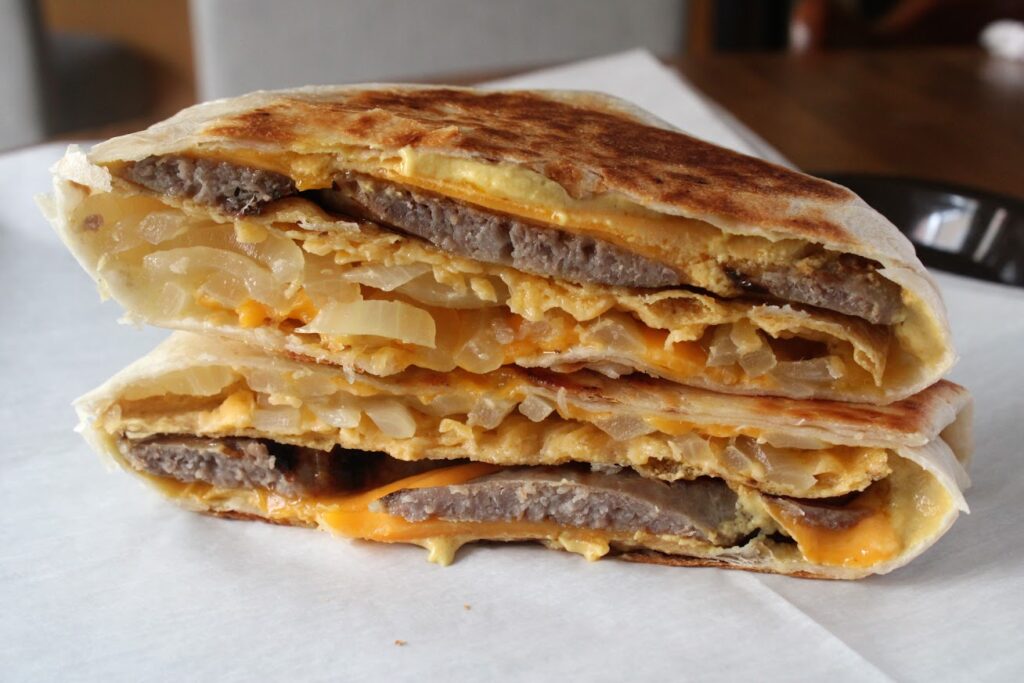
The pimento cheese
If you’ve been subscribed to my blog for a while, you’ll be aware that I’ve written about pimento cheese quite a few times at this point. It’s a good spread to have in your recipe collection. It’s also great at parties and can have many functions at your next cookout.
Try putting some pimento cheese on your next hot dog or brat and you’ll see what I mean. Since pimento cheese works so well as a snack or a hot dog/brat/burger topping, I suggest keeping some pimento cheese on hand for cookouts. This cheese spread only takes a few minutes to make and you can make it a couple of days in advance if you want. But just beware, snack ninjas may end up eating all of it before the cookout.

Mom's pimento cheese
Pimento cheese is an awesome addition to a sausage biscuit sandwich. Growing up, I enjoyed a lot of pimento cheese sandwiches, with just the spread and sliced bread. This recipe also works great as a snack with crackers or pretzels.
Get RecipeHow to layer a brat and pimento cheese crunchwrap

Slice your brat and I like to sear the slices in a pan really quickly. You can use the same pan as the one that you’re about to sear your crunchwrap in. 
Toss a handful of your caramelized onions on top. Be fairly generous. 
Top the onions with a crunchy tostada. 
Spread some pimento cheese on top of the tostada. It might be easier to do this first while holding the tostada in one hand and a knife in the other. 
Fold each side up and close the crunchwrap. Hold the folds with your fingers until you can flip it over. 
Flip the wrapped crunchwrap over and the weight will keep everything tightly closed until you are ready to cook. 
Wipe out your pan, add a little oil and cook and sear the crunchwrap with the folded seam side down. This will harden the tortilla a little and it will “glue” the crunchwrap closed. 
Sear the bottom and the top of the crunchwrap by flipping every couple of minutes to monitor the browning. When it’s brown enough for your liking, it’s done. 
You don’t have to slice the crunchwrap in half like I do in all the photos. It’s less messy to eat if you do not slice it. But it’s hard to show what is inside without cutting. Serve that crunchwrap and eat!


Brat and pimento cheese crunchwrap recipe
Here’s how I turn leftover brats into crunchwraps.

Brat and pimento cheese crunchwrap

Turn your leftover brats into a fantastic crunchwrap experience. The addition of pimento cheese and flavorful onions bring all the flavors together.
Ingredients:
- 1 12-inch burrito size tortilla
- 1 cooked brat or sausage, sliced into quarter-inch thick slices
- 3 to 6 tablespoons cooked/caramelized onions
- 1 6-inch corn tostada
- pimento cheese spread (link to recipe)
- 1 teaspoon canola or vegetable oil
Directions:
Slice the brat into a quarter-inch thick slices. Anything less than a half inch will work fine.
In a large skillet over medium high heat, sear the slices of brat. These should be already cooked; this process is just to warm the meat and to add any caramelization or texture to the brat slices. Once it is warmed to your liking, remove the brat slices to a plate and wipe out the pan to be used later.
On a cutting board or clean, flat surface, lay down a 12-inch burrito tortilla and add the slices of your cooked and re-warmed brat in the center. You can use your corn tostada for reference, but you basically only want to add ingredients in a circle in the middle six inches of the 12-inch tortilla.
Add a few tablespoons of caramelized onions to the top of the sliced brat.
Top the brat slices and onions with the crunchy tostada shell.
Add pimento cheese to the top of the tostada. It is probably easier to do this by picking up the tostada and spreading the cheese spread on top.
Wrap your crunchwrap: Fold the sides of the flour tortilla up over the top, meeting in the middle. The below image shows a crunchwrap with cheddar cheese being folded, but it's the same concept.

Once folded, you can flip the crunchwrap over to retain the folds and shape.
In your large skillet over medium-high heat, add a teaspoon of oil.
Sear the bottom, folded side of the crunchwrap in the oil to seal in the goodness.
After 2 minutes, flip and sear the other side for 2 minutes. If either side isn't quite browned enough for your liking, you can flip and cook for an additional 1 to 2 minutes on each side.
After at least 4 minutes of cooking and when both sides of the crunchwrap have a nice, browned exterior, serve and enjoy.
Turn your cookout leftovers into crunchwraps
Check back next week when I will be posting a day later than usual, on TUESDAY, because I don’t want to send out my newsletter on July 4th when all of you will be at cookouts. Save the leftovers for crunchwraps!


sk says:
yessir
Ken Knudson says:
Yep, gonna do this with jalapeno cheddar brats.
Jonathan Surratt says:
That sounds like a great idea!