Detroit, Michigan, is not just home to wrapper Eminem and his mom’s spaghetti; it’s also very well known culinarily for a crispy-bottomed, thick style of pan pizza known as Detroit-style pizza. Another popular food item that Detroit is recognized for is Coney Island dogs, or Coney dogs, which are meat-sauce-topped hot dogs, very much reminiscent of a chili dog you might find in other parts of the country. And it is in one of those Detroit-based coney dog stands or restaurants where the Hani sandwich was born.
Speaking of Detroit-style pizza:
I wrote about and developed a pan pizza calculator that will build a pizza recipe for you that’s very similar to Detroit-style. You simply plug in the size of your pan, and it’ll calculate the recipe you need.
What is the Hani sandwich?
The name Hani™ is actually a trademark registered by National Coney Island, which is a Detroit-based restaurant chain that specializes in the Coney Island Dog. The Hani origin story goes that in the mid-1980s, a cook or chef at the Mack and Seven Mile location of National Coney Island, named Hani (not sure if this is a first or last name), had the habit of getting creative when serving members of the restaurant’s staff.

One of these Hani creations turned out to be somewhat like a quesadilla, served on a pita with slices of cheese and a chicken tenderloin. This was very much appreciated, and Hani’s most famous staff meal evolved into less of a quesadilla and more of a wrapped sandwich with a chopped-up fried chicken tender, lettuce, tomato, mayonnaise, Swiss and American cheese, all wrapped up in a fluffy, warmed pita.
Eventually, this pita-wrapped chicken tender took on the name of its creator, Hani, and it joined the Coney Dogs on the National Coney Island menu. Fast forward to today, and the Hani has become such an important part of National Coney Island and the Detroit region that the restaurant trademarked the name and even tried to start Pop’s Hani Shop in 2023 (according to the website, because of a disagreement with the building owner, they have currently closed this venture).

Note: because the Hani is trademarked by National Coney Island, most Detroit-area hot dog stands, diners, or other restaurants will typically call their version of the Hani a “chicken finger pita.”

The above, short Instagram video clearly shows how they make the original Hani sandwich at National Coney Island. Once you have all the ingredients, it’s very easy to make. Plus, you get to listen to the Oogum Boogum Song, which you probably haven’t heard in a few years.
Over the years, it’s just grown to a big percentage of our menu [sales] almost to where it’s rivaling the hot dog and the coney dog.
Tom Giftos – President of National Coney Island – in reference to the evolution of the Hani
Is a Hani just a gyro?
A Hani is not a gyro, but it’s certainly inspired by the gyro.
The Hani has some similarities with a gyro, which, interestingly enough, was also invented in the Midwest, but I wouldn’t call this a chicken finger gyro. I’m guessing that National Coney Island had gyros on its menu in the mid-1980s when the Hani was invented, and Chef Hani used one of those pitas to turn a couple of their chicken tenders into a fun meal or snack that shared only the pita and diced tomato with the gyro that they were likely serving. So maybe we can call the Hani a child or descendant of the gyro.
Other things invented in 1985:
- The Nintendo Entertainment System
- Microsoft Windows 1.0
- Teddy Ruxpin
- The Clapper
- Sour Patch Kids
Now that we know what the Hani is, and we know it’s not just a chicken tender wrapped in a thin flour tortilla, we need to tackle what clearly is one of the more important components of a Hani sandwich. The pita.
Soft pita
Pita is a flatbread that most likely has origins in the Middle East. Middle Eastern flatbreads like pita would be among the oldest types of bread that humans ever created. Pita is a yeast-leavened bread that is typically flat and circular or oval in shape. Some pita that you buy in stores will be specifically baked to create a pocket for stuffing, and some pita is meant for wrapping handheld meals like falafel, kebabs, or gyros.
In my experience, the process for creating pita is pretty easy in comparison to other baking projects. You combine the ingredients, knead them into a dough ball, allow it to rest and rise due to the yeast, and then separate the dough ball, shape the pita, and bake it or cook it on a hot, flat surface. If you’re a beginning baker, pita or many other types of flatbread are a good place to start. You’ll learn how to handle dough, and more importantly, you can learn how to work with flat dough, which can help you get practice for making pizza, tortillas, or even cinnamon rolls.


You can bake pita, or you can griddle pita. For this particular sandwich, I chose to griddle the pita, which just requires a fairly low and slow process for cooking the flattened dough until the exterior starts to get some nice browning on both sides. For me, this process took about 3 or 4 minutes per side for each pita.


Once the pita has been browned on both sides, it’s finished cooking on the exterior, but it could probably still use a bit of steam to soften it and ensure the middle is fully cooked. This takes place after you remove the pita from the hot surface (or oven) and add each pita into a stack under a clean kitchen towel. The pitas will steam each other, which finishes the cooking process, and altogether, this is a super important part of the process. Do not skip this part, and make sure to let all of your pita cool in a stack under a towel.
For the soft pitas I used in the Hani sandwiches I made, I followed my recipe below, but I created only 4 pitas instead of the recipe’s suggested 6. I made fewer so that the pitas that I made would be large enough to wrap around the chopped chicken tenders and ingredients.
")
Simple pita (oven method)
This recipe yields six soft pockets of bread for stuffing. You can use this recipe for pita pockets, or you can enjoy them folded like a gyro or a big puffy taco shell.
Get RecipeAfter we have the pitas made, we need to work on the chicken.
Chicken options
National Coney Island has two different options for chicken preparation on their Hani menu. You can get fried chicken tenders or grilled chicken. For my Hani sandwiches, I fried my chicken tenders, but I have placed 3 options for chicken just below with recipes for each option.
Buttermilk fried chicken tenders
Fried chicken tenders are awesome. They’re just the right size for dipping, and if cooked properly, they’re tender on the inside and crispy on the exterior.
I like to start my fried chicken tenders in a seasoned buttermilk marinade. Buttermilk is acidic, which helps to break down the proteins in the chicken, tenderizing an already tender piece of meat. You need at least 1 hour, but 4 hours would be better. You can even marinate this overnight if you want. The marinade will flavor the meat, which means that you’ll have a seasoned exterior and interior for your tenders.

The next stage of the fried chicken tender process is dredging or coating the tenders in seasoned flour. Since you’ve already got the chicken floating in a buttermilk marinade, you will only need a plate or bowl full of flour and seasonings to use to coat the tenders. My flour dredge is a little bit spicy, but you can follow the recipe, leaving out the cayenne pepper powder, and create a great chicken tender that won’t burn your taste buds.
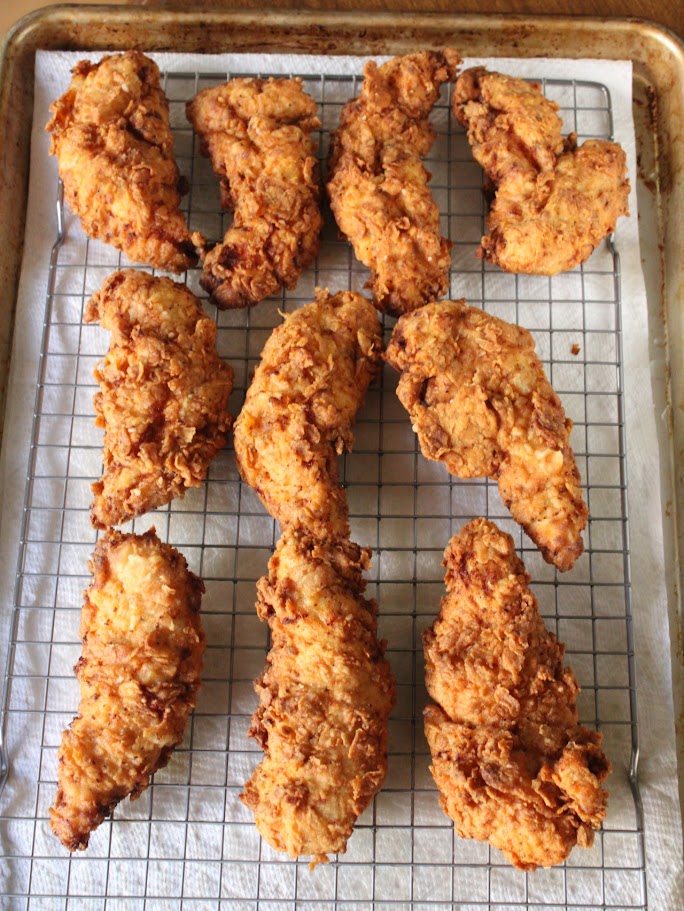

Once the tenders are all nicely coated in seasoned flour, you can fry them in peanut oil (or canola) at 350°F (176°C) for around 6 minutes per tender. If the oil isn’t quite deep enough to cover the top of the tenders, you will need to flip them over around halfway through to make sure everything gets crispy and browned properly.


Here’s my recipe for buttermilk fried chicken tenders. This recipe is a standalone recipe, but the full ingredients list and instructions are also in the Hani sandwich recipe down below.

Buttermilk fried chicken tenders
A quick and easy recipe for homemade fried chicken tenders. Perfect for dipping into your favorite honey mustard or barbecue sauce.
Get RecipeOven “fried” chicken tenders
If you don’t want to deep fry your chicken tenders, here’s a recipe you can use that will produce very tasty chicken, perfect for dipping or for adding to your next Hani sandwich. I’ve made this recipe a whole bunch of times, and it’s very well tested if you want to give it a shot.


Here’s my “oven-fried” tender recipe. As you can see above, I’ve made it quite a few times, and it’s great on its own, but these tenders would also work really well wrapped in a pita.

Oven "fried" crispy chicken tenders
These crispy, flavorful chicken tenders will trick you into thinking they were deep fried. You can choose your choice of potato chip flavor, but salt and vinegar is my favorite. The key is to make sure you have kettle-style chips.
Get RecipeGrilled chicken?
The Hani menu just says, “grilled chicken,” so I’m not sure if these are tenders or just chopped-up pieces of chicken tender that have been grilled. Here’s my fairly simple recipe for a nice piece of flavorful chicken that you can slice up to use in a Hani. Or, next time you are headed out to grill something for dinner, you can grill a couple of extra pieces of chicken that you can slice up later to turn leftovers into a Hani.

Spicy grilled chicken
A quick and easy chicken marinade recipe for the grill. It's very easy to adjust the level of heat by adding or subtracting the sriracha.
Get RecipeCheese slices
The menu at National Coney Island says that they use slices of Swiss and American cheese, so that’s what I used and placed in my recipe. But a Hani seems ripe for cheese experimentation. Grab any sliced cheese you have available, and when you are reheating the pita to soften it, place the cheese on top, across the middle to make sure it gets a nice bit of melt before adding the rest of the ingredients.
Choose your favorite cheese slices and go for it.

Tomato and lettuce
It’s easy to imagine that the Hani was invented with things that were around the restaurant at the time. The pita and diced red tomato were from a gyro. The chicken tenders were likely their own entree or kids’ menu option. The lettuce and mayonnaise were likely used on the burger along with the sliced cheeses, and the ranch dressing would have been a popular salad dressing option at the time.
The one thing that I feel would have been a nice addition to the Hani, but might have been a love it or hate it ingredient, would have been red onion, which National Coney Island would have had for their gyro.

But otherwise, if you want a traditional Hani, you need some diced tomato and shredded lettuce. I used the reddest tomato I could find at my grocery store at the time, and I thinly sliced some iceberg lettuce.
Ranch dressing?
Ranch dressing is typically served in a dippable container along with your Hani sandwich. I honestly think this sandwich would be just as great with a honey mustard or even a BBQ sauce dipper, so if you lean one of those ways, I would suggest you find the dip that you enjoy most.
But since ranch is the default, I figured this was a good opportunity to make my own ranch and tell you my tips for making your own.

To build ranch dressing, add the mayonnaise and sour cream together for the base of the dressing. 
Then add fresh dill and chives. 
Equal amounts of onion powder and garlic powder are added. 
Then salt and black pepper are next. 
One of the most important ingredients to homemade ranch is MSG. 
And then the buttermilk is simply added until you can stir the dressing to see the consistency that you would like. 
Salad dressings might need a thin consistency and dips might need to be thicker. Add buttermilk to thin things out.
First, you can view the above simple slideshow with all the ingredients listed in the order that I added them.
In my experience, one of the most important ingredients in homemade ranch is monosodium glutamate or MSG. If you look at the ingredients list on a packet of Hidden Valley Ranch seasoning, MSG is the fourth ingredient, just behind its friend, salt. This means there’s more MSG in a packet of ranch seasoning than garlic powder, onion powder, or even any of the herbs or spices.

If you talk about ranch dressing with people who really love ranch, you might hear them say something like “this restaurant makes their own ranch.” If this is in reference to a chain restaurant like Jet’s Pizza or Wingstop, that usually means they are making it from a base of mayonnaise, buttermilk, and they are probably using a large version of a Hidden Valley Ranch seasoning packet. The difference in the packets vs the actual bottled Hidden Valley Ranch dressing is that Monosodium Glutamate—if it exists in the dressing at all—is much lower in the ingredients list.
If you taste dressing made from a Hidden Valley Ranch packet directly against the Hidden Valley Ranch dressing from a bottle—and I have done this—you can tell a big difference, and I’m pretty sure one of the big factors and flavor differences is because of the amount of MSG in each.

What is MSG?
MSG or Monosodium Glutamate is a man-made product that is a processed form of glutamic acid, which is an amino acid that is essential in forming proteins. Glutamate is in many foods that you know and probably love, like cheese and tomatoes, and it’s typically responsible for “umami” or savory flavors in some foods. When used in conjunction with salt, MSG helps to accentuate and balance savory flavors in food.
My homemade ranch recipe definitely uses MSG because I think it’s one of the more important ingredients in creating a dressing that’s very similar to that “house-made ranch” that you will find ranch dressing fans raving about at many restaurants.

Homemade ranch dressing
The valley isn't so hidden, when you know the secret recipe. This recipe allows you to vary the consistency of the final product.
Get RecipeThe Hani
The Hani build process
Here’s a gallery of photos of the build process that I use to create a Hani. My process is rightfully, heavily influenced by the official National Coney Island Instagram reel that I shared above. Click any image to turn it into a swipeable slideshow.


As you can see, once you have the ingredients all ready, building a Hani is very easy. I would suggest having some toothpicks or skewers at the ready to help keep things wrapped. That’s what they do at National Coney Island, and that’s what I did as well.
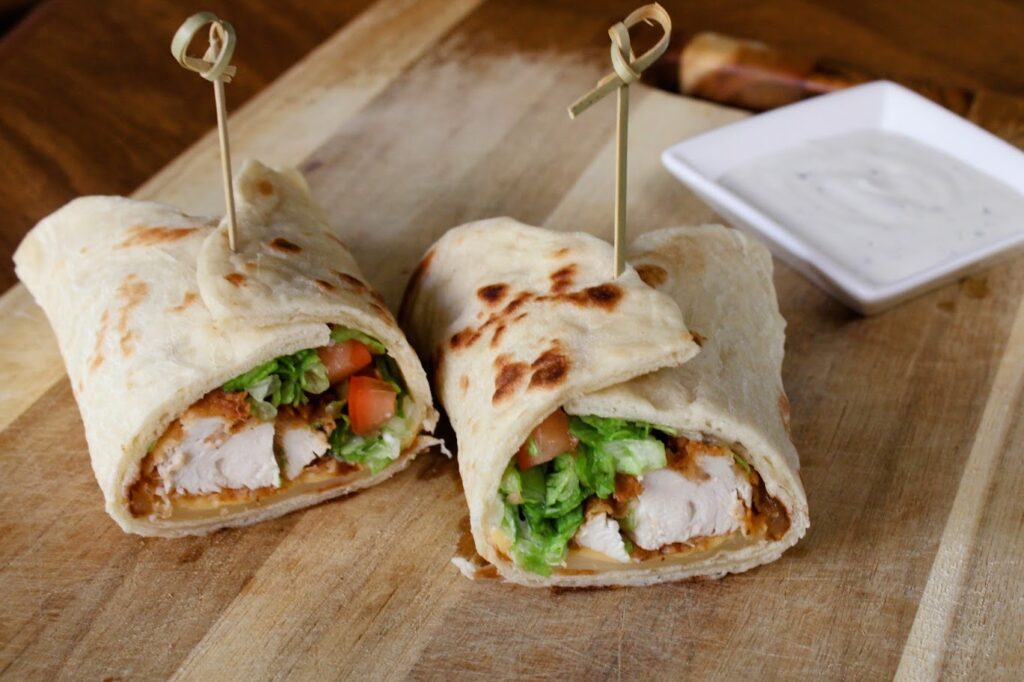
The Hani photos and recipe
Here are some photos of the Hani sandwiches that I made this week in the testing of my recipe. Scroll down just a bit more to get the full ingredient list and instructions to make one or two of these in your own kitchen. Don’t forget the ranch!


")
Chicken finger pita (aka the Hani)

Crispy fried chicken tenders wrapped inside a soft, puffy pita turn into a great sandwiching experience that originated in Detroit, Michigan. This is the Hani.
Ingredients:
Chicken tenders and buttermilk marinade- 1 pound chicken breast meat cut into strips (or chicken tender pieces)
- 1 cup buttermilk
- 1 teaspoon salt
- 1 teaspoon ground black pepper
- 1 teaspoon cayenne pepper
- 1⁄2 teaspoon paprika
- 2 to 4 tablespoon hot sauce (optional for extra spice)
- 1 1⁄2 cups all-purpose flour
- 1 tablespoon salt
- 1 teaspoon ground black pepper
- 1 teaspoon cayenne pepper
- 1 teaspoon onion powder
- 1 teaspoon garlic powder
- 1⁄2 teaspoon paprika
- peanut oil for frying
- 1 8 to 9-inch soft, round pita
- 1 slice of Swiss cheese
- 1 slice of American cheese
- mayonnaise
- 1 to 2 fried chicken tenders (from above)
- shredded lettuce
- diced tomato
Directions:
Chicken tenders and marinade: if you are using chicken breasts, slice the meat into thin strips.
Add salt, pepper, cayenne pepper, and paprika to buttermilk (add hot sauce if you want extra spice). and whisk to combine. Put chicken strips in a zip-top bag or bowl with a lid. Pour buttermilk marinade over the chicken and store in the fridge for at least an hour or overnight.
Seasoned flour: make seasoned flour by combining flour with all of the spices, salt, and pepper in a bowl or pan.
Remove one strip of chicken at a time from the marinade and dredge in the seasoned flour mixture until thoroughly coated on all sides. Place the fully coated chicken strip onto a piece of parchment or a sheet pan rack to rest.
Frying: heat 2 inches of peanut oil in a skillet to 350°F (175°C).
Fry each strip of chicken for 6 to 7 minutes or until it reaches 165°F internal temperature. You'll probably want to fry for 3 minutes on the first side and then flip it to make sure you're getting the level of browning that you want. Continue cooking on the other side.
After frying, place the finished chicken tenders on a cooling rack over paper towels to drain some of the oil away.
Hani assembly: layer one slice of each Swiss and American cheese on top of a round pita. In a 350°F (176°C) oven for 5 minutes, or under a broiler on high ,warm the pita so that it softens, while the cheese melts.
Slice 1 or 2 chicken tenders into smaller pieces, and when the cheese is melted, add the tender meat right down the middle, in a line from one side of the pita to the other.
Sprinkle some shredded lettuce and diced tomato on the side of the tender meat, and then roll the pita over until it is closed. Using toothpicks, seal the rolled wrap so that everything stays closed. Slice down the middle of the wrap and serve.
Check back next week
Next week we’re getting beefy and cheesy. Check back to read about that sandwich if you like either of those words.

