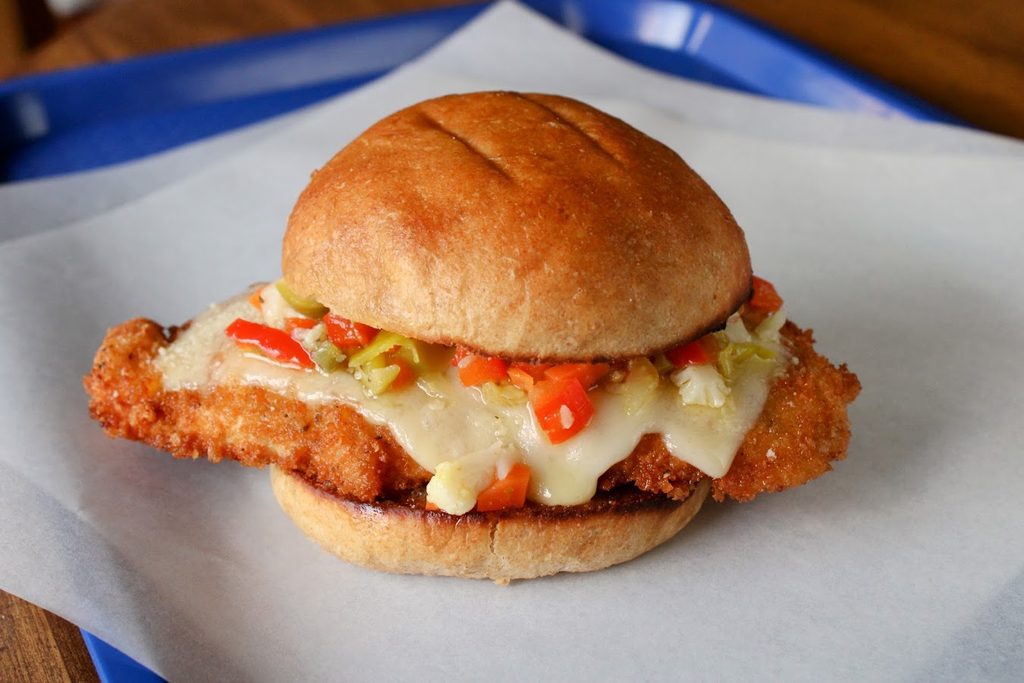
This sandwich blog post is about a crispy, chickeny, cheesy, and giardinera-y sandwich that should satisfy a whole lot of cravings. If you follow along, you’ll see that I’ve walked through where the sandwich inspiration came from, along with the components involved, and even shared a sandwich and bun recipe to go along with it. As always, there’s that Jump to Recipe button if you just want instant gratification, or you can scroll through to see how many photos a guy can take of fried chicken cutlets, cheese, and pickled vegetables.
What is this sandwich?
This sandwich is inspired by, but not necessarily a copycat of, a dish that I recently had at a national winery chain restaurant called Cooper’s Hawk Winery and Restaurant. My wife and I were running suburban errands, and we were starving and decided to give it a try.
Cooper’s Hawk was founded in Orland Park, Illinois, and has grown into a chain with 69—nice—locations across the Midwest and Southeast United States. If you’ve never visited, the feel of the restaurant is closer to a higher-end chain like Maggiano’s or Cheesecake Factory (not one designed by Saddam Hussein) than it is to something like an Applebee’s or Chili’s. They have a ton of different wines their company produced that are paired with each menu item by Bin Number. So if you want to go with a suggested pairing, you find the dish you want to eat, look at the Bin Number listed beside the menu entry, and then match it up with the wine list.

Apologies for the two photos in the section that I took at Cooper’s Hawk. We sat at the bar, and some weird lighting and shadows were happening that I didn’t really notice when we sat down. I also really wasn’t planning to make a sandwich inspired by my entree. Hopefully the photos still seem to convey what they need to display.
The Cooper’s Hawk Winery & Restaurant chain was founded in 2005 and seems to have launched out of the gate strong by winning a lot of food and beverage awards during its early years of existence. Eventually, it was purchased by a private equity company called Ares Management in 2019 for approximately 700 million dollars. I know a lot of people (myself very much included) have come to expect that when chains like this get scooped up by private equity, their quality will suffer, but my wife and I really did enjoy our food and service during our first and only visit to a Cooper’s Hawk restaurant. I typically prefer to support a local business, but if I’m nearby and looking for a meal, I would definitely give them a second shot based on our experience.
What’s in a name?
A Cooper’s hawk is a type of bird that can be found in North America, from Mexico to Canada. The bird species was named by Frenchman Charles Lucien Bonaparte in honor of his friend William Cooper, who loved birds and was also a conchologist (shell zoologist).
A Cooper is the job title of a person who crafts wooden barrels that might eventually be used to store wine. Coopers handle shaping the wood, and they are assisted by a hooper who creates the metal bands that hold all of the wood staves together, ensuring that the barrel stays watertight.

This isn’t really meant to be a review of our visit, but my wife and I tried the Thai lettuce wraps, and she ordered the chicken Maidera (which I tasted). All three dishes were better than either of us expected. Don’t expect cheap food, though. The entrees are all pushing towards the top pricing of chain restaurant fare.
The menu at Cooper’s Hawk has an entree-sized Chicken Giardiniera, but if you show up between 11 am and 3:30 pm, you can choose a slightly smaller and less expensive portion. I got the lunch-sized chicken giardiniera, and it was plenty of food. If you’re skipping out on the lunch portion to move up to the full portion, the math works out that you’re basically paying an additional 10 bucks for an extra chicken cutlet, which you might not need in that one seating, but it might serve you well in a to-go box.

Cooper’s Hawk’s chicken giardiniera dish is called Tim’s Favorite Chicken Giardiniera because a guy named Tim McEnery founded the restaurant (I asked our bartender who Tim was). It’s a solid dish. The chicken was tender and flavorful, swimming in a thin, buttery, and lightly vinegary sauce that clearly had some of the giardiniera brine mixed in. The pickled vegetables brought just a bit of heat, but the dish wasn’t overly hot in the spice department. The mashed potatoes—named on the menu as Mary’s potatoes—were super smooth, creamy, and complemented the dish well.
Overall, I really enjoyed Tim’s favorite chicken giardiniera, and as per usual, for a guy who runs a sandwich blog, I started thinking of how I could convert it or something very similar into a sandwich.
Turning the dish into a sandwich
Most of the time, a sandwich includes bread—not counting the last sandwich I wrote about—and for this one I wanted to go with my wife’s most requested burger or sandwich bun recipe that I bake. This part of the sandwich is wholly unrelated to the dish that I was served at Cooper’s Hawk, but this bun is a great vessel for a chicken sandwich, which leads us to the star of the show. I chose to use chicken breast halves to create thinner cutlets, but if you wanted, you could use boneless thighs as well. The chicken is coated in a Parmesan and Panko breadcrumb crust and then fried until crispy in a bit of oil to give the sandwich a bit of texture and crunch.

I made a batch of my own pickled giardiniera and chopped that up very finely to be used in a Parmesan giardiniera butter, which was used for toasting the bun. Swiss cheese (and more Parmesan) was layered on top of the chicken and broiled lightly to get melty. Then finally a bit more giardiniera was spooned onto the sandwich as a pickled textural element to make things more fun to eat.
Bee-Pee-Cee-Gee: Breaded Parmesan Chicken Giardiniera sandwich.
Now that we know what sandwich we’re making, we need to get started on the individual components.
Honey wheat buns
I make a lot of bread. I think most of what I have made and shared is pretty good. But my wife is typically indifferent about most of it. She’s not a bread person. She thinks it’s all just fine and she’ll eat it, but she actually requests my honey wheat buns whenever we’re planning a burger night or making something like grilled chicken sandwiches for dinner. So, I will bake them in an attempt to make the crowd happy.
This particular bun has a touch of sweetness that comes from the honey in the recipe, which will help to give the exterior a nice caramel browning. I wouldn’t say that sandwich bun is overly sweet, though. For me, it’s just the right amount to create a brown bun and offset the salt that is added to the dough.


Much like some of my other burger bun recipes, this dough requires both potato flour and dry milk powder. These are both helpful in creating a soft bun that has a slightly longer shelf life due to the moisture in the finished, baked buns.
Basting each bun with melted butter after the baking process will help to create a softer bun exterior as well as contributing a bit more buttery flavor to the finished sandwich buns.


Here’s my honey wheat sandwich roll recipe, but if you don’t want to make your own rolls, you can just use your favorite store-bought burger buns. Mine are better, though. You should make mine.

Honey wheat sandwich buns
This bun introduces extra honey sweetness to a soft, but still chewy wheat bun. Squishy and flavorful, it's perfect for your next grilled chicken sandwich.
Get RecipeNon-breaded simple version of a chicken giardiniera sandwich
This sandwich was just for fun. After I had baked some buns, I had a couple of chicken thighs in the fridge and a fresh batch of giardiniera. 15 minutes later, I had sautéed the chicken thighs, toasted the bun, melted some cheddar cheese on top of the chicken, and turned it into this glorious sandwich.
This could very easily be THE chicken giardiniera sandwich. It’s got everything: the tender meat, toasty bun, and a slight amount of spice that brings a lot of depth and texture to the sandwich.


After the random weekday sandwich was complete, we moved on to making something more similar to the Cooper’s Hawk chicken giardiniera dish.
Homemade giardiniera
If you’ve never experienced it, giardiniera—sometimes shortened to giard, pronounced as jard—basically refers to a batch of pickled vegetables. Where I live, in Chicago, giardiniera is a really big deal.
The word giardiniera comes from the Italian language, and in Italy they do serve a relish of pickled vegetables that were originally created as a way to preserve their gardens for the colder seasons. Traditional Italian giardiniera is similar to the kind that you’ll find in Chicago and possibly throughout some of the Midwest; it might just be that some of the vegetables used are different from the kind of giard you’d find in Chicago. In the United States, giardiniera isn’t something you’ll find consistently across the country (it’s getting there, though).

I made the giardiniera for this sandwich, but you can buy it if you can find it where you live. If you’re in an online shopping mood, I really like J.P.Graziano brand giardiniera, which you can find online at their shop, or you can find it and other versions of giardiniera at places like Amazon.
If you’re more of a do-it-yourselfer, giardiniera isn’t hard to make, but it does take a bit of time for preparation and vegetable chopping. I’ve made my version quite a few times at this point, and I do try to write the recipe in a way that you can boil/simmer vegetables at the same time that you are prepping other vegetables in order to save a little bit of time. But if a time crunch stresses you out like they occasionally do with me, you can just chop everything before the recipe starts and keep batches of the veggies in separate bowls for use when their time comes.


The three different batches of vegetables are staged in such a way and added into the simmering liquid in the proper order due to their thickness and time for each veggie to soften. The hardest vegetables, like carrot and cauliflower, are woody, and they benefit from a bit longer to cook to a point where they will still be a little firm, but softened to resemble the textures of the other vegetables. All of the pickled vegetables go in last because they have gone through a process that softens them already. Just follow the schedule in the recipe, and you should be all good on the textural side of things for your finished giardiniera.


Giardiniera is typically pickled and then packed in a jar with oil, which keeps the pickles moist and creates a tiny bit of pickly and oily “sauce” when you spoon out some veggies onto your sandwich or pizza.
You might be tempted to use olive oil vs. other vegetable oils to fill up the giardiniera jar to keep the vegetables covered in oil, but just know that olive oil will firm up when it gets cold and other vegetable oils will not. This isn’t a huge deal, but it does mean that your giardiniera might need to be pulled out of the fridge a few minutes before using in order for the oil to warm up slightly and decongeal.


Giardiniera
This giardiniera recipe is spicy but not super-hot. I'd list it as between mild and medium heat. Add more pickled jalapenos (and the pickling liquid) or leave them out entirely to adjust the heat level for your sandwiching experiences.
Get RecipeParmesan giardiniera butter
The original dish that I am loosely basing this sandwich on was swimming in a buttery and vinegary sauce, so I figured mixing some butter in with minced giardiniera pieces and using that to toast the sliced wheat bun could bring some of that flavor into the finished sandwich. I did not really create a standalone recipe for this giardiniera butter, but it’s basically half a stick of softened, salted butter with about a tablespoon of finely minced giardiniera mixed in.
Spread that giardiniera butter on top, then I sprinkled a little grated Parmesan cheese and broiled the sliced bun until it got a little toasty and the butter and Parmesan were all melted.


Parmesan-crusted chicken cutlets
This recipe uses two chicken breast halves to create two sandwiches, which both end up being about a quarter of a pound of meat. The whole goal for how we’re treating the meat is to produce a consistently sized piece of meat, which means that the chicken will cook evenly during the frying process.
If you cook regularly, knowing how to butterfly a chicken is pretty important. Chicken breasts in the current era are pretty large, and typically I’d say they’re at least twice as large as they should be to fit one sandwich portion (your mileage may vary on this). Butterflying the chicken breast means slicing a boneless breast in a horizontal direction so that you can open it up like a book (or butterfly). This helps to ensure that a chicken breast is consistently thick, which makes it easier to cook evenly.
For this recipe, you go one step further than butterflying by cutting all the way through the split-open butterfly, which creates two breast cutlets that should be about the same size.

After you have two thinner cutlets, we need to flatten them even more, which gives them a bit more surface area to fill out a standard-size bun. To do this, I like to lay plastic wrap or a torn-up zip-top bag on top of the chicken and pound it flatter with the smooth side of a kitchen mallet. The plastic wrap keeps the mallet clean, and it will also keep little pieces of raw chicken from flying around your kitchen during the pounding process. Pound the chicken until it’s a consistent thickness from top to bottom. I shoot for between a quarter and a half inch thick.
The frying process starts with a three-stage breading situation. First, we have seasoned flour, which is all-purpose flour mixed with a bit of salt and black pepper. Then the floured meat is moved into an egg wash consisting of just one egg whisked very well. Once each cutlet is fully moistened by the egg, move it into a mixture of Panko breadcrumbs, grated Parmesan cheese, salt, and black pepper.
Now your cutlets are both ready to fly and you can let them rest for 5 or 10 minutes while you get the oil ready for frying.


When it’s time to fry, set up a pan with about half an inch of oil that you’ve heated up to 350 F. At this point, if you actually pounded the chicken, it should almost cover the meat, but not quite. Fry the breaded cutlets for 3 minutes per side and then remove to a cooling rack over paper towels to hopefully remove just a bit of the excess hot oil.


Once the chicken cutlets are brown and crispy, they should be rested briefly on a cooling rack to ensure they do not become soggy. Resting them on a plate or a cutting board will force the bottom of the cutlet to steam itself, turning that crispy exterior much softer.
You do not need to let these rest very long, though, because we’re going to move them into the oven, topped with some cheese, which will help to melt the top of the cheese while you’re also toasting the bottom and top of your buns.
I demonstrate this in a photo in the next section.

Swiss cheese
Cheese in this sandwich isn’t required, but I do think it helps contribute some creaminess that otherwise is only included in the giardiniera butter-toasted bun. You could use pretty much any cheese, but for this version I went with Swiss slices. The Swiss gives a bit of a drier, nutty taste, but it still melts pretty well on top of the hot, recently fried chicken cutlet while spending a couple of minutes under a broiler.
This is convenient because my recipe also calls to toast/broil the top of the giardiniera butter-slathered buns, and they can both toast until the bun is slightly browned and the cheese is melted.


Breaded Parmesan chicken giardiniera photos and recipe
Below are some photos of the sandwiches I ate during the testing phase of this Bee Pee Cee Gee sandwich. It’s a crunchy, cheesy sandwich that brings a lot of briny vinegar flavor, which creates excitement for the experience.
Scroll through and appreciate the photos to get to the full recipe.


BPCG: Breaded Parm Chicken Giard

Adding crispy and savory breaded chicken cutlets into a buttery and slightly spicy sandwich roll gets even better when the cheese is melty, and the giardiniera is hitting just right.
Ingredients:
Giardiniera butter- 2 ounces salted butter, softened (1/2 stick - 4 tablespoons)
- 1 tablespoon pickled giardiniera, minced into very small pieces
- 1 boneless, skinless chicken breast, butterflied and cut into cutlets
- 1⁄4 cup all-purpose flour
- 1 teaspoon salt (divided)
- 3⁄4 teaspoon black pepper (divided)
- 1 whole large egg
- 1⁄2 cup Panko breadcrumbs
- 1⁄4 cup Parmesan cheese, grated
- peanut or vegetable oil (enough to come up at least 1/2 inch deep in your pan/pot)
- 2 sandwich or burger buns
- 2 to 4 tablespoons giardiniera butter (from above)
- 2 breaded Parmesan cutlets (from above)
- 2 to 3 slices Swiss cheese (or mozzarella/provolone)
- 2 to 4 tablespoons giardiniera
Directions:
Giardiniera butter: combine the softened butter with the chopped and minced giardiniera until everything is incorporated. Store in the fridge until about 30 minutes before sandwich time. At that point, remove it from the fridge to give the butter a chance to soften up.
Breaded Parm chicken cutlets: first, you need to butterfly your chicken breast and then cut it into two pieces. Butterflying cuts the chicken breast parallel to your cutting board so that you will have a flat, thinner piece of chicken. Here's a short butterflying tutorial if you've never butterflied a chicken breast before. After you've butterflied the chicken, go ahead and cut the large chicken piece in half so that you have two thin cutlets.
Cover the cutlets with plastic wrap or, even better, a large zip-top bag that you have laid on top of the chicken. Using a meat mallet or a heavy pot, pound the chicken through the plastic to attempt to flatten each piece of chicken until it is around 1/2-inch thick.
Set up your chicken dredging station. You will need three bowls or large plates for this.
The first bowl will contain 1/4 cup all-purpose flour. Add 1/2 teaspoon salt and 1/2 teaspoon black pepper to the flour. The second bowl will contain 1 whole egg, whisked well. The third bowl will have 1/2 cup Panko breadcrumbs, 1/4 cup grated Parmesan cheese, 1/2 teaspoon salt, and 1/4 teaspoon black pepper. Whisk to combine.
Working with one cutlet at a time, place it first in the seasoned flour and make sure it's coated well. Then move it into the whisked egg and ensure there are no dry spots on the cutlet. Finally, move it to the breadcrumb mixture and press the cutlet on both sides to make sure that the Parmesan and Panko crumbs are fully coating the chicken. Move it to a cutting board and finish with the second cutlet.
Add peanut or vegetable oil to a large pan or pot until it's round 1/2 inch deep. Place the pan or pot over medium-high heat and allow it to warm up until it's around 350 F (175 C).
Once the oil is up to temperature, carefully place each of your cutlets into the oil and fry them for 3 minutes, then flip and fry for an additional 3 minutes. The cutlets should be very thin so they will cook quickly.
When the cutlets are fully cooked, remove them from the oil to a paper-towel-lined sheet pan or onto a cooling rack over a paper-towel-lined sheet pan.
Broil buns and melt cheese: spread the giardiniera butter on both inner sides of your two split sandwich buns. Place on a foil-lined sheet pan, butter side up. Place both cutlets on the foil and top them with slices of cheese.
Broil for 3 to 4 minutes or until the buns are toasty, the butter is melted, and the cheese has also melted a bit. Remove and allow everything to cool for 3 or 4 minutes. The chicken should be very hot.
Sandwich assembly: place a cutlet on top of the bottom bun. Spoon giardiniera on top of the melted cheese and then close the sandwich with the top bun.
Serve and enjoy.
Check back in two weeks
As I’ve stated a few times now, I’m currently moving to a one-sandwich-every-two-week schedule. I felt like I was close to burning out, but this seems to be working out well for my mental health, so I’m going to keep it up for the time being. Because of this, I barely know what my sandwich will be at this point. Subscribe or come back soon to find out.
.jpg)