With rapidly rising food costs and government-funded food benefit programs in the United States shutting down, it’s incredibly difficult for me to think about writing about food that many people can not afford. If you are able, please find a nearby food bank and contribute what you can through donations or by volunteering your time.
Sometimes I make high-effort sandwiches. This is one of those times. This is a tasty, if not slightly complicated, sandwich composed of five homemade components that I made in my kitchen. You can definitely skip some steps to make things easier if you’d like, and I’ve included some notations at the bottom of the write-up on each sandwich component to suggest how you can simplify the process by purchasing store-bought ingredients.
For those of you who like a fun and tasty challenge, this sandwich is for you.
I’ve started grouping all of the heavy-duty, big effort sandwiches that I post about into a Maximum Effort category. Some sandwiches are easy, but when you’re making more than 4 components for a sandwich entirely from scratch, the effort often gets turned up to 11.
What is this sandwich?
I recently realized that I hadn’t made a sandwich with pork belly in a while, so this concept started there. When my mind goes to pork belly, I think of breakfast because of the bacon-ness of it, but for this sandwich experience, I wanted to take a different direction.
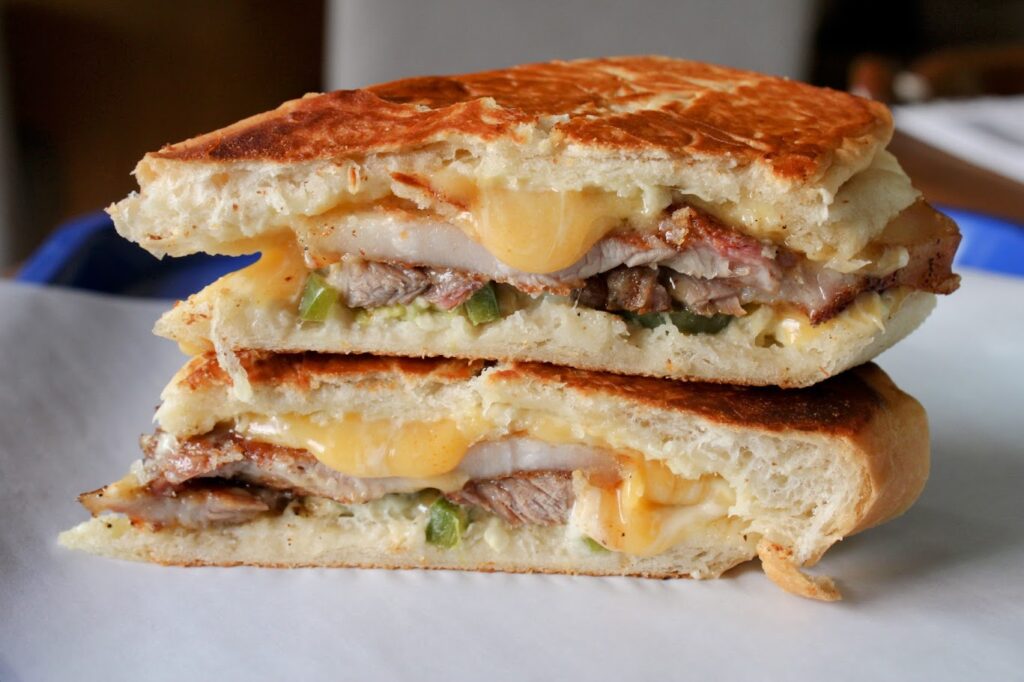
This sandwich combines tender and savory roasted pork belly with a crispy skin, which is partnered with a melty cheddar cheese that I infused with maple syrup and cayenne pepper powder. Yes, it’s sweet and spicy cheese slices that you can make in about 15 minutes—keep reading to find out how.

Those two main ingredients are accompanied by homemade pickled jalapenos and a roasted garlic mayonnaise. Everything is packed into a homemade Cuban-style roll that is buttered and pressed to create a savory, crispy exterior that surrounds all of the sandwich components.
This is not a sandwich for the weak. It’s a sandwich that requires some time and effort to achieve, but it’s well worth it when you slice it and take that first bite.
Now that we know what sandwich we’re making, let’s discuss the components. As always, I like to start with the bread.
Cuban-style bread rolls
For this sandwich, I knew I wanted to put all the ingredients into the bread with the intention of pressing and turning it all into a panini or a pressed sandwich like a “Cubano.”
Because of that, I used my Cuban-style bread roll recipe. It works great in a Cuban sandwich, so it should work great in this pressed pork-focused sandwich as well. This Cuban-style bread is tender in the middle with a bit of a crust, but in the case of a Cubano sandwich, the majority of the bread’s texture comes through the panini process.

I used bacon fat instead of lard in this recipe, and it works just fine. Lard is simply fat, and leftover bacon grease is pretty much just fat too.


As I said, for this particular roll recipe, I used bacon fat instead of lard because I had plenty of grease stored up, and I didn’t want to buy a whole container of lard for one batch of rolls. This means that the roll could have a bit of a smoky element in it due to the bacon grease, but you’re using a small enough amount in a roll recipe that it really doesn’t contribute too much unless you eat the bread on its own.

The role of fat in bread baking is to provide flavor as well as contribute to softening the crumb of the bread. A bread recipe does not require fat; in fact, many breads, like French baguettes, do not contain fat at all, but the addition of fat can help soften the bread as well as keep the rolls from drying out as quickly.


Here’s my Cuban-style bread roll recipe that works great with cold cuts for a sub, and it stands up well to a panini press as you’d expect. As I said, I used bacon grease, but the recipe is written to use lard. If you want to swap out another fat like butter (or bacon fat), it’s easy to just swap out the same amount, and it should work just fine.
Store-bought bread substitution:
If you don’t want to make your own bread, you should look for a fairly soft, long American-style sub sandwich roll. Those aren’t exactly like Cuban-style rolls, but after they are filled with ingredients and then buttered and pressed in a panini, they will function very similarly.
")
Cuban bread rolls (Pan Cubano)
Making Cuban sandwiches? First you're going to need to find some lard. Then you'll need to make these soft, semi-crusty rolls that eventually you'll smash between two hot surfaces. Oh, and you'll need some pork, ham (also pork), mustard, Swiss cheese and pickles!
Get RecipeOven-roasted pork belly
If you’ve never cooked pork belly, it’s the cut of meat from a pig where bacon comes from—the belly. Bacon is smoked or cured, and most pork belly that you purchase at the butcher’s or grocery store will be raw. You could buy a pork belly and smoke it yourself to create a big slab of bacon that you can then slice and cook.
Or if you want to do what I did, you can roast a Cajun spice-rubbed pork belly in your oven until the pork is fully cooked and the skin is crispy. I personally still like to slice the pork belly and sear those just a bit to warm the meat and render a bit more of the fat to create textures that will work great in the sandwich.


Pork belly, like all pork, needs to be cooked to 165°F (74°C) to be fully cooked. But there’s a lot of fat in pork belly that just won’t be broken down properly at that temperature. The collagen or fat in the pork belly will not start breaking down until the internal temperature is above 170°F (77°C), so to make sure the textures in the pork belly are ideal, we will need to go well above 170°F.
This is a great article from the ThermoWorks blog about cooking pork belly in the oven and some brief glimpses into the science behind the decisions. Basically, they suggest cooking the meat in a 250°F oven until the internal temperature hits 195°F and then finishing the pork belly in a 500°F oven until the skin starts bubbling and turns into crispy crackling.


You can also use the broiler to crisp up the skin after the meat has hit 195°F. But be very careful of the broiler, because things can go from dark brown to black in just a few seconds, so monitor very closely if you decide to use the broiler to crisp things up.


At this point, the meat is fully cooked, but I think it really benefits from warming the sliced meat in a skillet to crisp it up before adding it to a sandwich. This also has a side benefit of helping to warm the inside of the sandwich, which should force the cheese to get all melty.


Store-bought pork substitution (sort of):
If you want to skip making your own pork belly and still create this sandwich, I would suggest that you use two cuts of pork to achieve the same textural situation that this pork belly recipe provides. I would first suggest searing a boneless pork chop and pairing that with some crispy bacon slices. Add both to the sandwich with the rest of the ingredients, and you’ll get some of the same textures while retaining a similar flavor profile.

Oven-roasted pork belly
This recipe creates tender pork belly slices with a crackling skin that can be seared before adding to a sandwich or serving as the main breakfast, lunch, or dinner course.
Get RecipeSpicy maple cheddar slices
Yes, I made my own cheese slices for this sandwich. Do you need to do this? Probably not. But the process of making cheese slices is super easy and takes about 15 or 20 minutes of effort. You do need a special ingredient, though, and that is Sodium Citrate, which helps to create a smooth cheese sauce from shredded cheese, some sort of liquid, plus whatever ingredients you want to flavor the cheese with.
Once you have that smooth cheese sauce, you can use it for nachos or pour it on your next horseshoe sandwich, or you can cool it off in a big pan to create flat cheese that can be cut into slices.


Store-bought cheese substitution:
If you want to use another type of sliced cheese, I would suggest simply buying some cheddar or, even better, using a slice of cheddar and a slice of deli-style American cheese to recreate some of the ooey-gooey cheesiness that your own homemade slices made with sodium citrate might achieve.

Spicy maple cheddar cheese slices
How would you like to create a very meltable slice of cheese with a hint of sweetness balanced by a kick of spice? This is the recipe for that.
Get RecipePickled jalapenos
This recipe for addictive pickled jalapenos is based on my MSG pickle recipe, but minus the dill weed, and swaps out cucumber slices for jalapeno slices. The recipe produces a tender slice of jalapeno that’s packed with a slightly sweet and salty brine.
These pickled jalapenos are great on top of pizza or nachos or even eaten as a snack, but they are spicy and a bit variable depending on the spice in each jalapeno. There’s not much you can do to temper the heat when you are pickling them, but when you add these to a sandwich with a whole bunch of cheese and bread, the spice will be minimized.

Store-bought pickled jalapeno substitution:
Whip up a batch of these and keep them in the fridge for a while until an emergency arises where you might need a spicy pickle addition. These pickled jalapenos are a component of this complicated sandwich that you could definitely swap for store-bought jalapenos. Just find your favorite brand and skip this step if you want to cut a corner or two.

Pickled MSG jalapenos
Need a spicy kick with a bit of crunchy texture in your next sandwich? They're also perfect to spice up your next nacho or taco night.
Get RecipeRoasted garlic mayonnaise
I’m just going to start off here with the fact that this is a fantastic mayonnaise recipe. It’s easy to make (especially if you have an immersion blender), and it’s super savory and works great in everything except for a peanut butter and jelly sandwich (I haven’t tried this yet). If you don’t count the 45 to 60 minute garlic roasting time, the recipe even takes about two minutes to make. You can even make it with pre-peeled garlic or a whole garlic clove if you want. So there are all sorts of shortcuts to be used here.


Once all the garlic is roasted, it’s time to make some mayonnaise, and if you used loose cloves of garlic like I did, you can simply dump them (plus the salt and oil) into the other mayo ingredients.


Making the mayonnaise requires either a whole bunch of whisking or an immersion blender. With a stick blender, it takes just 2 to 3 minutes to get everything to a thick, spreadable consistency. My recipe gives you instructions for making this mayo without a stick blender, and since this is a high-effort sandwich, maybe that’s the way to go. Just kidding, use the immersion blender if you have one.
Once you learn how easy it is to make your own mayonnaise and once you taste how much better it tastes than store-bought mayo, you might be hooked. It just requires 4 or 5 minutes total plus some cleanup time, and you’re all good to go.

Store-bought mayo substitution:
Here’s my roasted garlic mayonnaise recipe. If you were going to cut some corners on this high-effort sandwich, mayo is definitely a component that you could swap out for store-bought. Duke’s or Hellmann’s might not taste the same, but they would work just fine in this sandwich.

Roasted garlic mayonnaise
You like sandwiches. Sandwiches like you. You need this roasted garlic mayo to enhance your love for sandwiches. This recipe is perfect for any sort of fried potato as well. Ask the Belgians.
Get RecipePanini press or nah?
You can make this sandwich with one of those fancy panini press machines, or if you do not have one, you can do the same thing with two pans. I have a Cuisinart Griddler with interchangeable grates that I’ve been using for 10 or 12 years now. But it’s almost just as easy to use two pans. It helps if the top pan is a bit heavy, like cast iron, because that will press down on the sandwich to help things heat up and melt.
Just note that if you do use two pans, there’s a chance that the top one will be very hot even though it’s not touching the heat of the stove. Just be careful, especially if the pan is just barely balanced on the sandwich.


Cheesy pork belly panini photos and recipe
Keep scrolling to see a bunch of photos of this pork belly sandwich. The recipe is just past the photos.


Cheesy pork belly panini

This sandwich pairs tender pork belly with a crispy skin, along with homemade sweet and spicy cheese slices to create a great butter pressed sandwich experience.
Ingredients:
Homemade spicy maple cheddar cheese slices (optional)- 1⁄4 cup maple syrup
- 1⁄2 to 1 teaspoon cayenne pepper powder (adjust for spicier)
- 1⁄2 cup water
- 14 grams sodium citrate (a heaping tablespoon - see notes below for links to order)
- 16 ounces cheddar cheese, shredded
- 2.5 to 3 pounds pork belly, skin on
- 1 to 2 tablespoons olive oil or vegetable oil
- 2 to 3 tablespoons cajun-style seasoning blend (or your favorite all purpose seasoning)
- 1 six-inch sandwich roll or Cubano roll
- 2 tablespoons mayonnaise
- 6 to 8 pickled jalapeno slices (optional)
- 3 or 4 slices of pork belly (from above)
- 1 to 2 slices of spicy maple cheddar cheese (from above, or use regular cheddar cheese)
- 1 to 2 tablespoons butter
Directions:
Spicy maple cheddar cheese slices (optional): add maple syrup to a small bowl or measuring glass and whisk in the cayenne pepper powder until it's combined.
Place a greased or Silpat-lined sheet pan in your oven on its lowest setting. Mine is 150°F.
Add water to a medium-sized pot and bring to a simmer. Add sodium citrate and stir to combine.
Slowly add all the shredded cheese, stopping to stir the cheese into the sauce after every handful. Once all the cheese is added, stir very well while the cheese is still simmering to make sure it is very smooth.
Slowly pour 2/3rds of the maple syrup and cayenne pepper mixture and stir again to incorporate it thoroughly into the cheese sauce.
Once the cheese sauce is nice and smooth, carefully pour the sauce over the warm sheet pan and shake the sheet pan to allow the sauce to spread out. You may need a knife or an offset spatula for this.
Sprinkle or drizzle the rest of the spicy maple syrup mixture and use a spoon or knife to spread it out to create a marbled look on the surface of the cheese.
Once the sauce is in a consistently thin layer, cover the cheese with wax paper and move it to the refrigerator to cool.
Once the cheese is fully cool, you can carefully remove it from the sheet pan and slice the cheese into 4-inch or 3.5-inch squares or whatever shapes you desire. To store the cheese, place a piece of parchment or wax paper between each slice and store it in the refrigerator for up to three weeks.
Crispy oven-baked pork belly: wipe the pork belly off with paper towels and place it on a sheetpan, skin side up. Make sure the skin is very dry and store it in the fridge overnight.
When you are ready to cook, preheat your oven to 300°F (148°C).
Remove the pork belly from the fridge and dry the skin very well with paper towels. Rub the olive oil all over the surface of the pork belly, and then coat all sides with your seasoning blend.
Place the pork belly on a wire rack placed in a sheet pan or baking dish, skin side up, and cook for 2.5 to 3 hours or until the internal temperature reaches 190°F.
Remove the pork belly from the oven and raise the heat in the oven to 500 degrees F (260°C).
Place the pork belly back in the oven for an additional 25 to 30 minutes. This is meant to crisp up the skin. You can also crisp up the skin by using the oven broiler as well, but be very careful because the exterior will burn quickly if you're not paying attention.
Remove the pork belly from the oven and allow it to cool for at least 30 minutes before slicing. If you want thinner slices, you can cool the pork belly in the refrigerator for 3 or 4 hours until the meat is firmer.
Sandwich assembly: in a medium pan over medium heat, sear the pork belly slices until they start to brown a little in a skillet or pan. This will warm the meat and create more texture on each slice.
Slice a sandwich roll and spread mayonnaise on the inside of both sides. Add a few pickled jalapenos to the bottom roll and top with some of the seared pork belly slices.
Top the meat with some cheese and close the sandwich.
Panini process: spread butter on both exterior sides of the sandwich and cook it in a panini press until the bread gets crusty and browned. If you do not have a panini press, you can use a hot cast iron skillet with another skillet on top of the sandwich, pressing it down. This will griddle the bottom side, and you will have to flip the sandwich, but it will work just fine.
Once both sides of the bread are browned and the cheese is melty, serve and enjoy.
Notes:
Sodium citrate is not going to be something you can find at the grocery store. Here is the brand of Sodium Citrate that I use from Amazon.
Check back next week
I spent too much time working on this sandwich, but I do have a plan for next week’s sandwich. It’s going to be Greek-focused, but still in a bun. Keep your eyes on your inbox to find out what I’m talking about!

